
Outline
Seeds
Germination
Seed Dormancy
Techniques to Break Dormancy
Seed Scarification
Seed Stratification
Growing Plants from Seed
Media
Sterilizing Containers
Sowing Seeds
Water and Light
Transplanting Seedlings
Cuttings
Root Cuttings
Stem Cuttings
Cane Cuttings
Leaf Bud Cuttings
Leaf Cuttings
Asexual Propagation- Other Methods
Layering
Separation and Division
Budding and Grafting
Micropropagation
Objectives
This chapter teaches people to:
- Understand the basic principles of sexual and asexual propagation.
- Be familiar with common methods of sexually and asexually propagating plants.
- Know the recommended timing for propagating plants.
Introduction
Plant propagation is the process of producing a new plant from an existing one. It is both art and science requiring knowledge, skill, manual dexterity, and experience for success.
To understand the science of why, when, and how to propagate requires basic knowledge of plant growth and development, plant anatomy and morphology, and plant physiology.
There are two general types of propagation: sexual and asexual. Sexual propagation is the reproduction of plants by seeds. The genetic material of two parents is combined by pollination and fertilization to create offspring that are different from each parent. There are several advantages of sexual propagation:
- It may be quicker and more economical than asexual propagation.
- It may result in new cultivars and vigorous hybrids.
- For some plants, it may be the only means of propagation.
- It provides a way to avoid transmission of particular diseases, such as viruses.
- It maintains genetic variation, which increases the potential for plants to adapt to environmental pressures.
Asexual propagation, sometimes referred to as vegetative propagation, involves taking vegetative parts of a plant (stems, roots, and/or leaves) and causing them to regenerate into a new plant or, in some cases, several plants. With few exceptions, the resulting plant is genetically identical to the parent plant. The major types of asexual propagation are cuttings, layering, division, separation, grafting, budding, and micropropagation. Advantages of asexual propagation include:
- It may be easier and faster than sexual propagation for some species.
- It may be the only way to perpetuate particular cultivars.
- It maintains the juvenile or adult characteristics of certain cultivars.
- It allows propagation of special types of growth, such as weeping or pendulous forms.
- It may more quickly result in a large plant (compared to one propagated by seed).
A form of asexual reproduction in plants, in which multicellular structures become detached from the parent plant and develop into new individuals that are genetically identical to the parent plant.
Sexual Propagation
Seeds
Most seeds are composed of three major parts: embryo, endosperm (food storage) tissue, and a seed coat (protective tissue) (Figure 13–1). The embryo is a miniature plant in a resting (dormant) state. Most seeds contain a built-in food supply called the endosperm. The protective outer covering of a seed is called the seed coat. It protects seeds from mechanical injury and from diseases and insects. Also, the seed coat usually prevents water from entering the seed until time to germinate. The seed coat in many cases allows seeds to be stored for extended periods. The seed leaves, cotyledons, differ in shape from the true leaves. Monocots (such as corn) produce only one cotyledon; dicots (like beans) produce two cotyledons (Figure 13–2). Some gymnosperms, like pines, have many cotyledons.
To obtain vigorous plants from seeds, start with high-quality seeds from a reliable source. Select cultivars that provide the desired size, color, and growth habit. Choose cultivars adapted to your area. Many vegetable and flower cultivars are hybrids that may cost more than open-pollinated types, but they usually have more vigor, more uniformity, and better growth than nonhybrids.
Purchase only enough seed for one year because the likelihood of germination decreases with age. The seed packet label usually indicates essential information about the cultivar or species, such as the year in which the seeds were packaged, the germination percentage, and whether the seeds have received any chemical treatment.
If seeds are obtained well ahead of the actual sowing date (or are surplus seeds), store them in a cool, dry place. Laminated or foil packages help ensure dry storage. Paper packets are best kept in tightly sealed containers and maintained around 40°F in low humidity. A good storage location would be an airtight jar in the refrigerator. Gardeners can save money and cultivate a rewarding hobby by saving seeds from plants in their own gardens. Seeds that have been produced through insect, animal or wind, or other natural pollination methods are known as open-pollinated. Open-pollination can increase biodiversity, and plants may display different characteristics than the parent plants. This is especially true when saving seed from hybrids.
Table 13–1. Germination information for selected plants.
| Plant | Approximate Time to Sow Before Last Frost (weeks) | Time Seeds Take to Germinate (days) | Temperature (°F) | Light/Dark Requirement |
|---|---|---|---|---|
| Ageratum | 8 | 5–10 | 70 | Light |
| Alyssum | 8 | 5–10 | 70 | Either |
| Aster | 6 | 5–10 | 70 | Either |
| Balsam | 6 | 5–10 | 70 | Either |
| Begonia | 12 or more | 10–15 | 70 | Light |
| Broccoli | 8 | 5–10 | 70 | Either |
| Browallia | 12 or more | 15–20 | 70 | Light |
| Cabbage | 8 | 5–10 | 70 | Either |
| Cauliflower | 8 | 5–10 | 70 | Either |
| Celosia | 8 | 5–10 | 70 | Either |
| Centaurea | 6 | 5–10 | 65 | Dark |
| Coleus | 8 | 5–10 | 65 | Light |
| Cosmos | 4 or less | 5–10 | 70 | Either |
| Cucumber | 4 or less | 5–10 | 85 | Either |
| Dahlia | 8 | 5–10 | 70 | Either |
| Dianthus | 10 | 5–10 | 70 | Either |
| Eggplant | 8 | 5–10 | 70 | Either |
| Geranium | 12 or more | 10–20 | 70 | Light |
| Impatiens | 10 | 15–20 | 70 | Light |
| Larkspur | 12 or more | 5–10 | 55 | Dark |
| Lettuce | 8 | 5–10 | 70 | Light |
| Marigold | 6 | 5–10 | 70 | Either |
| Muskmelon | 4 or less | 5–10 | 85 | Either |
| Nicotiana | 8 | 10–15 | 70 | Light |
| Pansy (Viola) | 12 or more | 5–10 | 65 | Dark |
| Pepper | 8 | 5–10 | 80 | Either |
| Petunia | 10 | 5–10 | 70 | Light |
| Phlox | 8 | 5–10 | 65 | Dark |
| Portulaca | 10 | 5–10 | 70 | Dark |
| Snapdragon | 10 | 5–10 | 65 | Light |
| Squash | 4 or less | 5–10 | 85 | Either |
| Tomato | 6 | 5–10 | 80 | Either |
| Verbena | 10 | 15–20 | 65 | Dark |
| Vinca | 12 or more | 10–15 | 70 | Either |
| Watermelon | 4 or less | 5–10 | 85 | Either |
| Zinnia | 6 | 5–10 | 70 | Either |
Germination
Germination is the resumption of active embryo growth after a dormant period. Three conditions must be satisfied for a seed to germinate:
- The seed must be viable; that is, the embryo must be alive and capable of germination.
- Internal conditions of the seed must be favorable for germination; that is, any physical, chemical, or physiological barriers to germination must have disappeared or must have been removed by the propagator.
- The seed must be subjected to appropriate environmental conditions, including water (moisture), proper temperature, oxygen, and, for some species, light (Table 13–1).
The first step in germination is absorption of water. An adequate, continuous supply of moisture is important to ensure germination. Once germination has begun, a dry period can kill the embryo.
Light can stimulate or inhibit seed germination of some species. Plants that require light for germination include ageratum, begonia, browallia, impatiens, lettuce, and petunia. Other plants germinate best in the dark. These include calendula, centaurea, phlox, and verbena. Some plants germinate in either light or dark. Seed catalogs and seed packets often list germination and cultural information for particular plants. When sowing light-requiring seeds, sow them on the soil surface. Supplemental light can be provided by fluorescent fixtures suspended 6 to 12 inches above the soil surface for 16 hours a day.
Respiration in dormant seeds is low, but they do require some oxygen. Respiration rate increases during germination. The medium in which the seeds are sown should be loose and well aerated. If the oxygen supply during germination is limited or reduced, germination can be severely retarded or inhibited.
Temperature affects the germination percentage and the rate (speed) of germination. Some seeds germinate over a wide range of temperatures; others have a narrow range. Many species have minimum, maximum, and optimum temperatures at which they germinate. For example, tomato seeds have a minimum germination of 50°F, a maximum of 95°F, and an optimum germination temperature of 80°F. When germination temperatures are listed, they are usually optimum temperatures. For most plants, 65 to 75°F is best.
Seed Dormancy
Viable seeds that do not germinate are dormant. Dormancy can be regulated by the environment or by the seed itself. If a seed is not exposed to sufficient moisture, proper temperature, oxygen, or for some species, light, the seed will not germinate. In this case, the seed's dormancy is caused by unfavorable environmental conditions.
Some seeds may not germinate because of some inhibitory factor of the seed itself. This kind of dormancy consists of two general types: (a) seed coat (or external) dormancy and (b) internal (endogenous) dormancy. A seed can also exhibit both kinds of dormancy.
Techniques to Break Dormancy
Seed Scarification
External dormancy results when a seed's hard seed coat is impervious to water and gases. The seed will not germinate until the seed coat is altered physically. Any process of breaking, scratching, or mechanically altering the seed coat to make it permeable to water and gases is known as scarification. In nature this may occur during the winter, when freezing temperatures crack the seed coat or while microbial activities modify the seed coat as the seed lies in the soil. Scarification may also occur as the seed passes through the digestive tract of an animal.
Scarification can be forced, rather than waiting for nature to alter the seed coats. Commercial growers scarify seeds by soaking them in concentrated sulfuric acid. Seeds are placed in a glass container, covered with sulfuric acid, gently stirred, and allowed to soak for 10 minutes to several hours, depending on the species.
Reference books give appropriate concentrations and durations. When the seed coat has been modified (thinned), the seeds are removed, washed, and sown. Sulfuric acid can, however, be very dangerous for an inexperienced individual and should be used with extreme caution. Vinegar is safer and can be used for some species; the technique is the same as with sulfuric acid.
With mechanical scarification, seeds are filed with a metal file, rubbed with sandpaper, or cracked gently with a hammer to weaken (break) the seed coat. Another method is hot water scarification. Bring water to a boil (212°F), remove the pot from the stove, and place the seeds into the water. Soak the seeds until the water cools; then remove them and let them dry.
Seed Stratification
The second type of imposed dormancy, internal dormancy, is regulated by the inner seed tissues. This dormancy prevents seeds of many species from germinating when environmental conditions are not favorable for survival of the seedlings. There are several different types of internal dormancy. "Shallow" dormancy, displayed by many vegetable seeds, simply disappears with dry storage. No special treatment is necessary. However, other types require a particular duration of moist-chilling or moist-warming periods, or both.
Cold stratification (moist-chilling) involves mixing seeds with an equal volume of a moist medium (sand or peat, for example) in a closed container and storing them in a refrigerator. Periodically, check to see that the medium is moist but not wet. The length of time required to break (remove) dormancy varies by species; check reference books for recommended times. This type of dormancy may be satisfied naturally if seeds are sown outdoors in the fall. Warm stratification is similar except temperatures are maintained at 68 to 86°F depending on the species.
Seeds of some species exhibit double dormancy. This is a combination of two types of dormancy, such as external and internal dormancy. To achieve germination with seeds having both external and internal dormancy, the seeds must first be scarified and then stratified for the appropriate length of time. If the treatments are administered in reverse order, the seeds will not germinate. After completing these treatments, plant the seeds under the proper environmental conditions for germination.
Growing Plants from Seeds
Media
A wide range of media can be used to germinate seeds. With experience, you will learn to determine what works best for you. The germinating medium should be fine and uniform yet well aerated and loose. It should be free of insects, disease organisms, nematodes, weeds, and weed seeds. It should also be of low fertility and capable of holding moisture but be well drained. Purchase commercial potting media containing fine-particle pine bark, sphagnum peat moss, and perlite, or prepare a combination of equal parts (by volume) of these materials. Do not use garden (mineral) soil to start seedlings; it is not sterile, it is too heavy, and it does not drain well. Soil mixes have little fertility, so seedlings must be watered with a dilute fertilizer solution soon after germination and emergence.
Containers
Plastic cell packs can be purchased or reused if sterilized. In this system, each cell holds a single plant. This method reduces the risk of root injury when transplanting. Peat pellets, peat pots, or expanded foam cubes can also be used for producing seedlings. Resourceful gardeners often use cottage cheese containers, the bottoms of milk cartons, bleach containers, or pie pans. Just make certain that adequate drainage holes are made in the bottoms of the containers and that the containers are sterile.
Sterilizing Containers
The importance of using sterile medium and containers cannot be overemphasized. Before using the containers, wash them to remove any debris, immerse them in a fresh solution of one part chlorine bleach to nine parts water for five minutes, and allow them to dry.
Sowing Seeds
Seedlings are often started indoors 4 to 12 weeks before the last spring frost (Table 13–1). A common mistake is to sow the seeds too early and then attempt to hold the seedlings under poor environmental conditions. This usually results in tall, weak, spindly plants that do not perform well in the garden. The following paragraphs give general guidelines for sowing seeds for transplants. Nevertheless, it is important to refer to the instructions on the seed packet for more specific information.
When sowing seeds, fill the container to within 3⁄4-inch of the top with moistened growing medium. For very small seeds, use a fine, screened medium such as a layer of fine vermiculite for the top 1⁄4-inch. Firm the medium at the corners and edges with your fingers or a block of wood to provide a smooth and level surface.
For medium and large seeds, make furrows 1 to 2 inches apart and 1⁄8-inch to 1⁄4-inch deep across the surface of the planting medium. Sowing in rows improves light and air movement. If damping-off disease occurs, there is less chance of it spreading. Seedlings in rows are easier to label and handle at transplanting time than those that have resulted from broadcasting seeds. Sow the seeds thinly and uniformly in the rows by gently tapping the packet of seed. Cover the seeds lightly; a suitable planting depth is usually about two to four times the minimum diameter of the seeds.
Extremely fine seeds such as carrot, petunia, and snapdragon should not be covered, but simply dusted on the surface of the germinating medium and watered with a fine mist. If these seeds are broadcast, strive for a uniform stand by sowing half the seeds in one direction, then sowing the remaining seeds in the other direction.
Large seeds are frequently sown directly in a small container or cell pack, which eliminates the need for early transplanting. Usually, sow two or three seeds per cell. Later, thin them to allow only the most vigorous seedling per cell to grow.
Most garden stores and seed catalogs offer indoor and outdoor seed tapes. Seed tapes have precisely spaced seeds enclosed in an organic, water-soluble material. When planted, the tape dissolves and the seeds germinate normally. Seed tapes are convenient for extremely small, hard-to-handle seeds. Seed tapes allow uniform emergence, eliminate overcrowding, and permit sowing in perfectly straight rows. The tapes can be cut at any point for multiple row plantings, and thinning is rarely necessary. Tapes are more expensive per seed.
Water and Light
Moisten the planting medium thoroughly before planting. After seeding, spray with a fine mist or place the containers in a pan or tray that contains about 1 inch of warm water. Avoid splashing or excessive flooding, which might displace small seeds. When the planting mix is saturated, set the container aside to drain. The soil should be moist but not overly wet.
The seed flats should remain sufficiently moist during the germination period. Excessive moisture, however, can lead to damping-off or other disease or insect problems. Place the whole flat or pot into a clear plastic bag to maintain moisture. The plastic should be at least 1 inch above the soil. Keep the container out of direct sunlight; otherwise, the temperature may increase and injure the seeds. Many home gardeners cover their flats with panes of glass instead of using a plastic bag. Be sure to remove the plastic bag or glass cover when the first seedlings emerge.
After the seeds have germinated, move the flats to a well-lighted location; the temperature should be 65 to 70°F during the day and 55°F to 60°F at night. This prevents soft, leggy growth and minimizes disease problems. Some crops, of course, may grow best at different temperatures.
Seedlings must receive bright light after germination. Place them in a south-facing window. If a large, bright location is not available, place the seedlings under fluorescent lights. Use two 40-watt, cool-white fluorescent tubes or special plant growth lamps. Position the plants 6 inches below the light source and provide 16 hours of light daily. As the seedlings grow, the lights should be raised. A more detailed discussion of lighting is covered in chapter 18, "Plants Grown in Containers."
Transplanting Seedlings
Plants not seeded individually must eventually be transplanted into their own containers as seedlings to give them proper growing space. A common mistake is to leave the seedlings in the flat too long. The ideal time to transplant young seedlings is when the first true leaves appear.
Dig up the small plants carefully with a knife or plant label. Let the group of seedlings fall apart and pick out individual plants. Gently ease them apart to avoid root injury in the process. Handle small seedlings by their leaves, not their delicate stems (Figure 13–3). Using a small tool or your finger, punch a hole in the medium. Plant a seedling at the same depth at which it was growing in the seed flat. Firm the soil and water gently. Keep newly transplanted seedlings in the shade for a few days, or place them under fluorescent lights. Locate them away from sources of direct heat. Continue watering and fertilizing as in the seed flats.
Containers for seedlings should be economical, durable, and make efficient use of available space. Individual pots or plastic cell packs can be used. Another possibility is compressed peat pellets, which expand to form compact individual pots when soaked in water.
They waste no space, do not fall apart as easily as peat pots, and can be set out directly in the garden. If you wish to avoid transplanting seedlings altogether, compressed peat pellets are excellent for direct sowing.
When setting plants outdoors that were grown in peat pots, be sure to break the sides of the pot and to cover the pot completely. If the top edge of the peat pot extends above the soil level, it may act as a wick and draw water away from the soil in the pot. Tear off the top lip of the pot and plant flush with the soil surface.
Examples of Seed Treatments
Camellia—Collect and plant in the fall before the seed coat hardens. If seeds are dry, soak them in warm water for 24 hours before planting. Some people pre-chill the seeds until radicle emergence and then plant the sprouted seeds.
Crabapple—Collect fruits as they begin to soften and when the seeds are brown. Remove the fruit pulp. Provide one to four months of cold-moist stratification. Seeds will germinate in 30 to 60 days.
Dogwood—Collect fruits (drupes) when they are red and when seeds are mature; if collection is delayed too long, birds may eat the fruit. Remove the pulp, clean, and air dry, then moist-chill them in a refrigerator for three to four months. Seeds can be planted in the fall, but they will not germinate until spring.
Goldenrain tree—Collect fruits when capsules turn brown but before they open. Extract seeds, dry, and store. Seed coats are very hard, and seeds will require scarification before germination.
Holly—Germinating holly seeds can be very difficult and extremely slow. It may take two to three years because of the holly's hard seed coat and an immature (rudimentary) embryo.
Maple—Variation in dormancy exists with different species of maples. Spring-maturing seeds of species such as red and silver maple should be collected immediately when mature, not permitted to dry, and sown immediately. For seeds of other maple species that mature in the fall, such as southern sugar maple, stratification for 90 to 120 days is necessary.
Oak—Acorns of white oak do not become dormant. When planted in the fall, roots will emerge during winter; shoots will emerge in the spring. On the other hand, acorns of black oak germinate best if stratified for one to three months (if not planted in the fall). Acorns of red oaks should be planted in the fall or stratified for one to three months. Check references for individual species.
Redbud—Germination is inhibited by an impermeable seed coat and embryo dormancy. Soak for 30 minutes in concentrated sulfuric acid or vinegar, and then follow up with three months of cold stratification.
Southern magnolia—Remove the fleshy pulp from around the seeds. Moist pre-chilling for two to four months is needed unless planted in the fall.
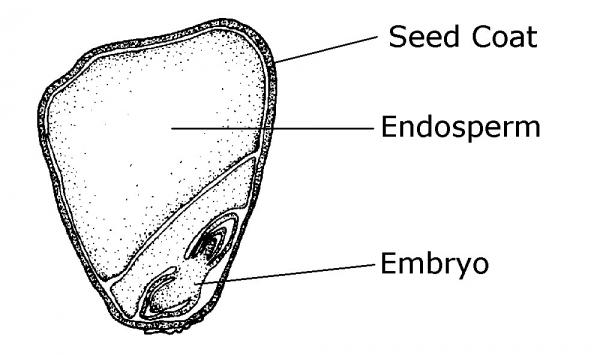
Figure 13–1. The three parts to a seed: 1. The protective tissue or seed coat 2. The embryo which grows into a new plant. 3. The endosperm which is the nutritive or food storage, supplying nutrients to the embryo.
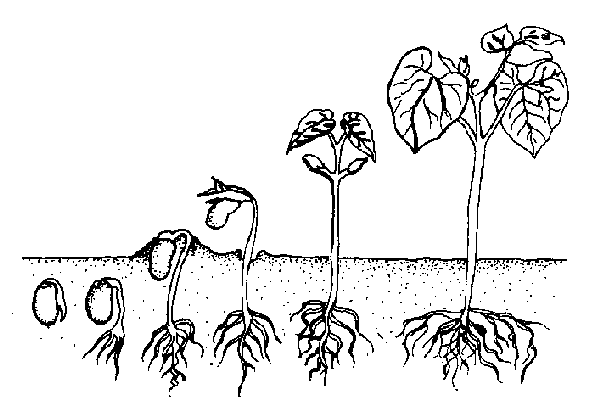
Figure 13–2. Seed germination of a dicot seedling.
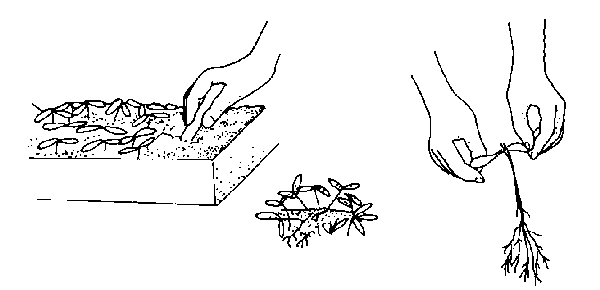
Figure 13–3. Remove seedlings from the tray and place them in a pile. Tease individuals out gently holding them by their leaves.
Asexual Propagation Cuttings
Asexual propagation is the process of taking vegetative pieces of a desirable plant and reproducing new plants from these tissues. Asexual propagation permits cloning of plants, meaning the resulting plants are genetically identical to the parent plant. The major methods of asexual propagation are cuttings, layering, division, separation, budding, grafting, and micropropagation (tissue culture).
CUTTINGS
Propagation by cuttings involves rooting a severed piece of the parent plant or, in some cases, producing new plants from severed pieces of tissue (leaf cuttings). A greenhouse is not necessary for successful propagation by cuttings.
If rooting only a few cuttings, you can use a flowerpot or small flat (Figure 13–4). Maintain high humidity by covering the cuttings with a bottomless milk jug or by placing the container into a clear plastic bag. Cuttings can also be placed in plastic trays covered with clear plastic stretched over a wire frame.
Containers must have holes in the bottoms for drainage. The plastic helps keep the humidity high and reduces water loss from the plant. If a more elaborate structure is needed, construct a small hoop frame or use an intermittent mist system. NC State Extension publication AG-426, A Small Backyard Greenhouse for the Home Gardener, may be helpful.
The rooting medium should be sterile, low in fertility, well drained to provide sufficient aeration, and moisture-retentive so that watering does not have to be done too frequently. Materials commonly used are coarse sand, a mixture of one part peat and one or two parts perlite (by volume), or one part peat and one part sand (by volume). Various commercial potting media may also be used. Vermiculite by itself is not recommended because it packs and tends to hold too much moisture. Media should be watered well before use.
There are several different kinds of cuttings. Which type you use depends on the kind of plant and, often, the plant's growth stage.
Some plants can be propagated from only a leaf, but most plants produce only a few roots or simply decay. Because leaf cuttings do not include an axillary bud, they can be used only for plants that are capable of forming adventitious buds. Leaf cuttings are used almost exclusively for propagating some indoor plants.
Leaf Cuttings
Leaf petiole—Remove a leaf and include up to 1½-inches of the petiole. Insert the lower end of the petiole into the medium (Figure 13–5). One or more new plants form at the base of the petiole. The leaf may be severed from the new plants—when they have their own roots—and then reused. Examples of plants that can be propagated by this method include African violet, peperomia, episcia, hoya, and sedum.
Leaf without a petiole—This method is used for plants with thick, fleshy leaves. The snake plant (Sansevieria trifasciata), a monocot, can be propagated by cutting the long leaves into 3-inch to 4-inch pieces (Figure 13–6). Insert the cuttings vertically into the medium. African violets (dicot) can also be propagated this way. Cut a leaf from a plant and remove the petiole. Insert the leaf vertically into the medium, making sure that the midvein is buried in the rooting medium. New plants form from the midvein.
Split-vein—Detach a leaf from the plant and remove the petiole. Make cuts on several prominent veins on the underside of the leaf (Figure 13–7). Lay the cutting, lower side down, on the medium. New plants form at each cut. If the leaf curls up, hold it in place by covering the margins with rooting medium. A variation of this method is to cut the leaf into wedges so that each piece has a main vein.
Leaf-Bud Cuttings
Leaf-bud cuttings are used for many trailing vines and when space or cutting material is limited. Each node on a stem can be treated as a cutting. The cutting consists of a leaf blade, petiole, and a short piece of stem with an attached axillary bud. Place cuttings in the medium with the bud covered (to 1 inch) and the leaf exposed (Figure 13–8). A modified version of a leaf-bud cutting, referred to as a single node cutting, can be prepared simply by cutting the stem below and above the leaf petiole having a well-developed axillary bud. Examples of plants propagated this way include blackberry, camellia, clematis, devil's ivy, dracaena, grape ivy, heart-leaf philodendron, jade plant, mahonia, rhododendron, and rubber plant.
Cane Cuttings
A cane cutting is an easy way to propagate some overgrown, leggy houseplants such as dumbcane, corn plant, Chinese evergreen, and other plants with thick stems. Leafless stem sections (2 to 3 inches long) are cut from older stems. Each cane should contain one or two nodes (Figure 13–9). Lay the cutting horizontally on the medium, or insert it vertically with about half of the cutting below the surface of the medium, and leave a bud facing upward. Cane cuttings are usually potted when roots and new shoots appear.
Stem Cuttings
Propagation by stem cuttings is the most commonly used method for many woody ornamental plants. Typically, stem cuttings of tree species are more difficult to root successfully; however, cuttings from trees such as crape myrtles, some elms, and birches can be rooted.
Types of Stem Cuttings
The four main types of stem cuttings are herbaceous, softwood, semi-hardwood, and hardwood. These terms reflect the growth stage of the stock plant, which is one of the most important factors influencing whether cuttings produce roots. Calendar dates are useful only as guidelines. Refer to Table 13–2 for more information on optimum growth stages for rooting stem cuttings of various woody ornamentals.
Herbaceous cuttings are made from nonwoody, herbaceous plants such as coleus, chrysanthemums, and dahlia. A 3-inch to 5-inch piece of stem is cut from the parent plant. The leaves on the lower one-third to one-half of the stem are removed, and the cutting is placed in the rooting medium. A high percentage of the cuttings root, and they do so quickly.
Softwood cuttings are prepared from soft, succulent, new growth of woody plants, just as it begins to harden (mature). Shoots are suitable for making softwood cuttings when they can be snapped easily when bent and when they still have a gradation of leaf size (oldest leaves are mature whereas newest leaves are still small). For most woody plants this stage occurs in May, June, or July. The soft shoots are quite tender, and extra care must be taken to keep them from drying out. The extra effort pays off, though, because they root quickly.
Semi-hardwood cuttings are usually prepared from partially mature wood of the current season's growth, just after a flush of growth. This type of cutting normally is made from mid-July to early fall. The wood is reasonably firm and the leaves of mature size. Many broadleaf evergreen shrubs and some conifers are propagated by this method.
Hardwood cuttings are taken from dormant mature stems in late fall, winter, or early spring. Plants are generally fully dormant with no obvious signs of active growth. The wood is firm and does not bend easily. Hardwood cuttings are most often used for deciduous shrubs but can be used for many evergreens. Examples of plants propagated at the hardwood stage include fig, forsythia, grape, privet, and spirea. The three types of hardwood cuttings are straight, heel, and mallet (Figure 13–10). A straight cutting is the most commonly used stem cutting. For the heel cutting, a small section of older wood is included at the base of the cutting. For the mallet cutting, an entire section of older stem wood is included.
Propagating Ferns by Spores
Although ferns are propagated more easily by division, some gardeners like the challenge of raising ferns from spores. Spores are the fern's means of sexual propagation, equivalent to seeds. The following is one proven method for germinating small quantities of spores.
Place a solid, sterilized brick in a pan, add water to cover the brick, and bake at 250°F for 30 minutes. When the brick is wet throughout, remove it from the water and place a thin layer of moist soil and peat (1:1 by volume) on top of the brick. Dust spores on the medium. Cover with plastic (not touching the spores) and place the brick in a warm place with indirect light. It may take up to a month for the spores to germinate. Keep moist at all times.
A small, heart-shaped structure, about 1⁄8-inch across (called a prothallus) develops first from each spore, forming a light green mat. Mist lightly to maintain high surface moisture because sperm must be able to swim to the archegonia (female organ). After about three weeks, fertilization should have occurred.
About two months later, pull the mat apart with tweezers in 1⁄4-inch squares and space them 1⁄2-inch apart in a flat containing a 2-inch bottom layer of sand, a 1⁄4-inch layer of charcoal, and a top 2-inch layer of a mixture of potting soil and peat (1:1 by volume). Cover with plastic and keep moist. When fronds (fern "leaves") appear, transplant to small pots. Reduce humidity gradually until plants can survive in less humid conditions. Light exposure may be increased at this time.
| Common Name | Scientific Name | Type of Cuttinga |
|---|---|---|
| Abelia | Abelia spp. | SW, SH, HW |
| Arborvitae, American; Northern white-cedar | Thuja occidentalis | SH, HW |
| Arborvitae, Oriental | Platycladus orientalis | SW |
| Azalea (evergreen & semi-evergreen) | Rhododendron spp. | SH |
| Barberry, Japanese b | Berberis thunbergii | SH, HW |
| Barberry, Mentor | Berberis x mentorensis | SH |
| Barberry, Wintergreen | Berberis julianae | HW |
| Bayberry; Wax myrtle | Myrica spp. | SW |
| Boxwood, Common | Buxus sempervirens | SH, HW |
| Boxwood, Littleleaf | Buxus microphylla | SH, HW |
| Camellia | Camellia spp. | SH, HW |
| Ceanothus | Ceanothus spp. | SW, SH |
| Cedar | Cedrus spp. | SH, HW |
| Cedar, Eastern red | Juniperus virginiana | HW |
| Cotoneaster | Cotoneaster spp. | SW, SH |
| Cryptomeria, Japanese | Cryptomeria japonica | SW, SH, HW |
| Cypress, False | Chamaecyparis spp. | SH, HW |
| Cypress, Leyland | x Cuprocyparis leylandii | SW, HW |
| Daphne | Daphne spp. | SH |
| Eleagnus, Thorny; Silverthorn | Elaeagnus pungens | SH, HW |
| Euonymus b | Euonymus spp. | SH |
| Fir | Abies spp. | SW, HW |
| Gardenia, Cape jasmine | Gardenia jasminoides | SH, HW |
| Heath | Erica carnea | SW, SH, HW |
| Heather, Scotch | Calluna vulgaris | SH, HW |
| Hemlock | Tsuga spp. | SW, HW |
| Holly, American | Ilex opaca | SH, HW |
| Holly, Chinese | Ilex cornuta | SH, HW |
| Holly, English | Ilex aquifolium | SH, HW |
| Holly, Foster's | Ilex x attenuata 'Fosteri' | SH, HW |
| Holly, Japanese | llex crenata | SH, HW |
| Holly, Yaupon | Ilex vomitoria | SH |
| Ivy, English b | Hedera helix | SH, HW |
| Jasmine | Jasminum spp. | SW, SH, HW |
| Juniper, Chinese | Juniperus chinensis | SH, HW |
| Juniper, Creeping | Juniperus horizontalis | SH, HW |
| Juniper, Shore | Juniperus conferta | SH, HW |
| Loropetalum |