

Spring Security provides a built-in authentication mechanism that verifies users using a username and password. However, many real-world applications require additional login fields such as name, department, employee ID, qualification, or security question to implement customized authentication.
- Create a custom login form with additional fields like Name and Qualification.
- Capture and process extra login fields using a Custom Authentication Filter.
- Validate additional fields using a Custom Authentication Provider before authenticating the user.
Implementation of the Extra Login Fields with Spring Security
Follow the steps below to implement extra login fields in Spring Security.
Step 1: Create a Spring Boot Project
Create a new Spring Boot project using Spring Initializr.
Add the following dependencies:
- Spring Web
- Spring Security
- Spring Data JPA
- Thymeleaf
- MySQL Driver
- Lombok
- Spring Boot DevTools
After creating the project, the folder structure will look similar to the following.

Step 2: Verify the pom.xml File
After project creation, verify that the required dependencies are present in your pom.xml file.
<?xml version="1.0" encoding="UTF-8"?>
<project xmlns="https://maven.apache.org/POM/4.0.0" xmlns:xsi="https://www.w3.org/2001/XMLSchema-instance"
         xsi:schemaLocation="https://maven.apache.org/POM/4.0.0 https://maven.apache.org/xsd/maven-4.0.0.xsd">
    <modelVersion>4.0.0</modelVersion>
    <parent>
        <groupId>org.springframework.boot</groupId>
        <artifactId>spring-boot-starter-parent</artifactId>
        <version>3.2.5</version>
        <relativePath/> <!-- lookup parent from repository -->
    </parent>
    <groupId>org.example</groupId>
    <artifactId>spring-security-login-extra-fields</artifactId>
    <version>0.0.1-SNAPSHOT</version>
    <name>spring-security-login-extra-fields</name>
    <description>spring-security-login-extra-fields</description>
    <properties>
        <java.version>17</java.version>
    </properties>
    <dependencies>
        <dependency>
            <groupId>org.springframework.boot</groupId>
            <artifactId>spring-boot-starter-data-jpa</artifactId>
        </dependency>


        <dependency>
            <groupId>org.springframework.boot</groupId>
            <artifactId>spring-boot-starter-security</artifactId>
        </dependency>
        <dependency>
            <groupId>org.springframework.boot</groupId>
            <artifactId>spring-boot-starter-thymeleaf</artifactId>
        </dependency>
        <dependency>
            <groupId>org.springframework.boot</groupId>
            <artifactId>spring-boot-starter-web</artifactId>
        </dependency>
        <dependency>
            <groupId>org.thymeleaf.extras</groupId>
            <artifactId>thymeleaf-extras-springsecurity6</artifactId>
        </dependency>

        <dependency>
            <groupId>org.springframework.boot</groupId>
            <artifactId>spring-boot-devtools</artifactId>
            <scope>runtime</scope>
            <optional>true</optional>
        </dependency>
        <dependency>
            <groupId>com.mysql</groupId>
            <artifactId>mysql-connector-j</artifactId>
            <scope>runtime</scope>
        </dependency>
        <dependency>
            <groupId>org.projectlombok</groupId>
            <artifactId>lombok</artifactId>
            <optional>true</optional>
        </dependency>
        <dependency>
            <groupId>org.springframework.boot</groupId>
            <artifactId>spring-boot-starter-test</artifactId>
            <scope>test</scope>
        </dependency>
        <dependency>
            <groupId>org.springframework.security</groupId>
            <artifactId>spring-security-test</artifactId>
            <scope>test</scope>
        </dependency>
    </dependencies>

    <build>
        <plugins>
            <plugin>
                <groupId>org.springframework.boot</groupId>
                <artifactId>spring-boot-maven-plugin</artifactId>
                <configuration>
                    <excludes>
                        <exclude>
                            <groupId>org.projectlombok</groupId>
                            <artifactId>lombok</artifactId>
                        </exclude>
                    </excludes>
                </configuration>
            </plugin>
        </plugins>
    </build>

</project>
Step 3: Configure Application Properties
These properties will be used throughout the application to establish the database connection and store the default application configuration.
spring.application.name=spring-security-login-extra-fields
spring.datasource.url=jdbc:mysql://localhost:3306/example
spring.datasource.username=root
spring.datasource.password=
spring.jpa.hibernate.ddl-auto=update
spring.jpa.show-sql=true
spring.main.allow-circular-references=true
app.user.username=maheshkm5001
app.user.password=Mahesh@123
app.user.name=Mahesh
app.user.qualification=B.Tech
Step 4: Create the User Entity
This entity represents the user information stored in the database. Along with the username and password, it also stores the user's Name and Qualification, which will be used during authentication.
package org.example.springsecurityloginextrafields.model;

import jakarta.persistence.Entity;
import jakarta.persistence.GeneratedValue;
import jakarta.persistence.GenerationType;
import jakarta.persistence.Id;
import lombok.AllArgsConstructor;
import lombok.Data;
import lombok.NoArgsConstructor;

@Entity
@Data
@AllArgsConstructor
@NoArgsConstructor
public class User {

    @Id
    @GeneratedValue(strategy = GenerationType.IDENTITY)
    private Long id;

    private String username;
    private String password;
    private String name;
    private String qualification;
}
Step 5: Create the User Repository
Create a new package named repository and inside it create a new interface named UserRepository.
package org.example.springsecurityloginextrafields.repository;

import org.example.springsecurityloginextrafields.model.User;
import org.springframework.data.jpa.repository.JpaRepository;
import org.springframework.stereotype.Repository;

@Repository
public interface UserRepository extends JpaRepository<User, Long> {
    User findByUsername(String username);
}
Step 6: Create the User Service
The service layer acts as an intermediary between the controller and the repository. It is responsible for saving new users and retrieving existing users during authentication.
package org.example.springsecurityloginextrafields.service;

import org.example.springsecurityloginextrafields.model.User;
import org.example.springsecurityloginextrafields.repository.UserRepository;
import org.springframework.beans.factory.annotation.Autowired;
import org.springframework.stereotype.Service;

@Service
public class UserService {

    @Autowired
    private UserRepository userRepository;

    // Save user into database
    public void saveUser(User user) {
        userRepository.save(user);
    }

    // Find user by username
    public User findByUsername(String username) {
        return userRepository.findByUsername(username);
    }
}
Step 7: Create CustomUserDetailsService
Spring Security uses the UserDetailsService interface to load user information during authentication. This class retrieves the user from the database and converts it into a Spring Security UserDetails object.
package org.example.springsecurityloginextrafields.service;


import org.example.springsecurityloginextrafields.model.User;
import org.springframework.beans.factory.annotation.Autowired;
import org.springframework.security.core.userdetails.UserDetails;
import org.springframework.security.core.userdetails.UserDetailsService;
import org.springframework.security.core.userdetails.UsernameNotFoundException;
import org.springframework.stereotype.Service;

import java.util.ArrayList;


@Service
public class CustomUserDetailsService implements UserDetailsService {

    @Autowired
    private UserService userService;

    @Override
    public UserDetails loadUserByUsername(String username) throws UsernameNotFoundException
    {
        User user = userService.findByUsername(username);
        if (user == null) {
            throw new UsernameNotFoundException("User not found");
        }
        return new org.springframework.security.core.userdetails.User(user.getUsername(), user.getPassword(), new ArrayList<>());
    }
}
Step 8: Configure Spring Security
This class is the central configuration for Spring Security. It performs the following tasks -> Configures authorization rules and Specifies the custom login page and Defines the login processing URL and Redirects users after successful authentication and Registers the custom authentication filter.
package org.example.springsecurityloginextrafields.config;

import org.example.springsecurityloginextrafields.fliter.CustomAuthenticationFilter;

import org.springframework.context.annotation.Bean;
import org.springframework.context.annotation.Configuration;
import org.springframework.security.authentication.AuthenticationManager;
import org.springframework.security.config.annotation.authentication.configuration.AuthenticationConfiguration;
import org.springframework.security.config.annotation.web.builders.HttpSecurity;
import org.springframework.security.config.annotation.web.configuration.EnableWebSecurity;

import org.springframework.security.web.SecurityFilterChain;

import org.springframework.security.web.authentication.UsernamePasswordAuthenticationFilter;

@Configuration
@EnableWebSecurity
public class SecurityConfig {

    @Bean
    public SecurityFilterChain securityFilterChain(HttpSecurity http) throws Exception {
        http.csrf().disable()
                .authorizeRequests()
                .requestMatchers("/login", "/perform_login").permitAll()
                .anyRequest().authenticated()
                .and()
                .formLogin()
                .loginPage("/login")
                .loginProcessingUrl("/perform_login")
                .defaultSuccessUrl("/home", true)
                .permitAll()
                .and()
                .addFilterBefore(customAuthenticationFilter(authenticationManager(http.getSharedObject(AuthenticationConfiguration.class))), UsernamePasswordAuthenticationFilter.class);

        return http.build();
    }

    @Bean
    public CustomAuthenticationFilter customAuthenticationFilter(AuthenticationManager authenticationManager) throws Exception {
        CustomAuthenticationFilter filter = new CustomAuthenticationFilter();
        filter.setAuthenticationManager(authenticationManager);
        return filter;
    }

    @Bean
    public AuthenticationManager authenticationManager(AuthenticationConfiguration authenticationConfiguration) throws Exception {
        return authenticationConfiguration.getAuthenticationManager();
    }
}
Step 9: Create CustomAuthenticationProvider
The Authentication Provider is responsible for validating user credentials. In addition to checking the username and password, it also validates the extra login fields such as Name and Qualification. If all values are valid, the user is authenticated successfully; otherwise, authentication fails.
package org.example.springsecurityloginextrafields.config;


import jakarta.servlet.http.HttpServletRequest;
import org.springframework.security.authentication.AuthenticationProvider;
import org.springframework.security.authentication.BadCredentialsException;
import org.springframework.security.authentication.UsernamePasswordAuthenticationToken;
import org.springframework.security.core.Authentication;
import org.springframework.security.core.AuthenticationException;
import org.springframework.security.core.userdetails.UserDetails;
import org.springframework.security.core.userdetails.UserDetailsService;
import org.springframework.security.core.userdetails.UsernameNotFoundException;
import org.springframework.stereotype.Component;


@Component
public class CustomAuthenticationProvider implements AuthenticationProvider {

    private final UserDetailsService userDetailsService;

    public CustomAuthenticationProvider(UserDetailsService userDetailsService) {
        this.userDetailsService = userDetailsService;
    }

    @Override
    public Authentication authenticate(Authentication authentication) throws AuthenticationException {
        String username = authentication.getName();
        String password = (String) authentication.getCredentials();

        UserDetails user = userDetailsService.loadUserByUsername(username);
        if (user == null) {
            throw new UsernameNotFoundException("User not found");
        }

        // Validate extra fields
        HttpServletRequest request = ((HttpServletRequest) authentication.getDetails());
        String name = (String) request.getSession().getAttribute("name");
        String qualification = (String) request.getSession().getAttribute("qualification");

        if (name == null || qualification == null) {
            throw new BadCredentialsException("Name or Qualification is missing");
        }

        // Implement your validation logic for name and qualification
        // For demonstration, we assume they must not be empty
        if (name.isEmpty() || qualification.isEmpty()) {
            throw new BadCredentialsException("Invalid name or qualification");
        }

        return new UsernamePasswordAuthenticationToken(user, password, user.getAuthorities());
    }

    @Override
    public boolean supports(Class<?> authentication) {
        return UsernamePasswordAuthenticationToken.class.isAssignableFrom(authentication);
    }
}
Step 10: Create CustomAuthenticationFilter
This filter intercepts every login request before authentication.
package org.example.springsecurityloginextrafields.filter;


import jakarta.servlet.FilterChain;
import jakarta.servlet.ServletException;
import jakarta.servlet.http.HttpServletRequest;
import jakarta.servlet.http.HttpServletResponse;
import org.springframework.security.authentication.UsernamePasswordAuthenticationToken;
import org.springframework.security.core.Authentication;
import org.springframework.security.core.AuthenticationException;
import org.springframework.security.web.authentication.UsernamePasswordAuthenticationFilter;


import java.io.IOException;

public class CustomAuthenticationFilter extends UsernamePasswordAuthenticationFilter {

    @Override
    public Authentication attemptAuthentication(HttpServletRequest request, HttpServletResponse response) throws AuthenticationException {
        String username = request.getParameter("username");
        String password = request.getParameter("password");
        String name = request.getParameter("name");
        String qualification = request.getParameter("qualification");

        UsernamePasswordAuthenticationToken authRequest = new UsernamePasswordAuthenticationToken(username, password);

        // Store extra fields in a way accessible to AuthenticationProvider
        request.getSession().setAttribute("name", name);
        request.getSession().setAttribute("qualification", qualification);

        return this.getAuthenticationManager().authenticate(authRequest);
    }

    protected void successfulAuthentication(HttpServletRequest request, HttpServletResponse response, FilterChain chain, Authentication authResult) throws IOException, ServletException {
        super.successfulAuthentication(request, response, chain, authResult);
    }
}
Step 11: Create the Controller
This controller manages User Registration and Registration Form Login Form It saves new users and returns the corresponding Thymeleaf pages.
package org.example.springsecurityloginextrafields.controller;


import org.example.springsecurityloginextrafields.model.User;
import org.example.springsecurityloginextrafields.service.UserService;
import org.springframework.beans.factory.annotation.Autowired;


import org.springframework.stereotype.Controller;
import org.springframework.web.bind.annotation.GetMapping;
import org.springframework.web.bind.annotation.PostMapping;
import org.springframework.web.bind.annotation.RequestParam;

@Controller
public class UserController {

    @Autowired
    private UserService userService;

    @GetMapping("/register")
    public String showRegistrationForm() {
        return "register";
    }

    @PostMapping("/register")
    public String registerUser(@RequestParam("username") String username,
                               @RequestParam("password") String password,
                               @RequestParam("confirmPassword") String confirmPassword,
                               @RequestParam("name") String name,
                               @RequestParam("qualification") String qualification) {

        if (!password.equals(confirmPassword)) {
            // Handle password mismatch
            return "redirect:/register?error=passwordsDoNotMatch";
        }

        User user = new User();
        user.setUsername(username);
        user.setPassword(password);
        user.setName(name);
        user.setQualification(qualification);

        userService.saveUser(user);

        return "redirect:/welcome";
    }

    @GetMapping("/login")
    public String showLoginForm() {
        return "login";
    }
}
Step 12: Create Main Class
Open the main class and put the below code. (No change are required)
package org.example.springsecurityloginextrafields;

import org.springframework.boot.SpringApplication;
import org.springframework.boot.autoconfigure.SpringBootApplication;

@SpringBootApplication
public class SpringSecurityLoginExtraFieldsApplication {

    public static void main(String[] args) {
        SpringApplication.run(SpringSecurityLoginExtraFieldsApplication.class, args);
    }

}
Step 13: Create the Registration Page
Create register.html inside the templates folder. The registration page allows users to enter:Username and Password and Confirm Password and Name or Qualification.
<!DOCTYPE html>
<html lang="en">
<head>
    <meta charset="UTF-8">
    <meta name="viewport" content="width=device-width, initial-scale=1.0">
    <title>Registration Page</title>
    <style>
        body {
            font-family: Arial, sans-serif;
            background-color: #f8f9fa;
        }

        .container {
            margin-top: 50px;
            display: flex;
            justify-content: center;
        }

        .card {
            width: 100%;
            max-width: 500px;
            box-shadow: 0 4px 8px rgba(0, 0, 0, 0.1);
            border-radius: 8px;
            background-color: #fff;
        }

        .card-header {
            background-color: #007bff;
            color: #fff;
            border-bottom: none;
            border-radius: 8px 8px 0 0;
            padding: 15px;
            text-align: center;
        }

        .card-body {
            padding: 25px;
        }

        .form-label {
            margin-bottom: 10px;
            font-weight: bold;
        }

        .form-control {
            width: 100%;
            padding: 10px;
            margin-bottom: 20px;
            border: 1px solid #ced4da;
            border-radius: 4px;
            font-size: 16px;
        }

        .btn-primary {
            background-color: #007bff;
            border: none;
            color: #fff;
            padding: 12px;
            font-size: 16px;
            border-radius: 4px;
            cursor: pointer;
            width: 100%;
        }

        .btn-primary:hover {
            background-color: #0056b3;
        }
    </style>
</head>
<body>
<div class="container">
    <div class="card">
        <div class="card-header">
            <h4>Register</h4>
        </div>
        <div class="card-body">
            <form method="post" action="/register">
                <div class="mb-3">
                    <label for="username" class="form-label">Username:</label>
                    <input type="text" class="form-control" id="username" name="username" required>
                </div>
                <div class="mb-3">
                    <label for="password" class="form-label">Password:</label>
                    <input type="password" class="form-control" id="password" name="password" required>
                </div>
                <div class="mb-3">
                    <label for="confirmPassword" class="form-label">Confirm Password:</label>
                    <input type="password" class="form-control" id="confirmPassword" name="confirmPassword" required>
                </div>
                <div class="mb-3">
                    <label for="name" class="form-label">Name:</label>
                    <input type="text" class="form-control" id="name" name="name" required>
                </div>
                <div class="mb-3">
                    <label for="qualification" class="form-label">Qualification:</label>
                    <input type="text" class="form-control" id="qualification" name="qualification" required>
                </div>
                <div class="d-grid">
                    <button type="submit" class="btn btn-primary">Register</button>
                </div>
            </form>
        </div>
    </div>
</div>
</body>
</html>
Step 14: Create the Login Page
Unlike the default Spring Security login page, this page accepts two additional fields - Name and Qualification These values are captured by the custom authentication filter and validated by the custom authentication provider.
<!DOCTYPE html>
<html lang="en">
<head>
    <meta charset="UTF-8">
    <meta name="viewport" content="width=device-width, initial-scale=1.0">
    <title>Login Page</title>
    <style>
        body {
            font-family: Arial, sans-serif;
            background-color: #f8f9fa;
        }

        .container {
            margin-top: 50px;
            display: flex;
            justify-content: center;
        }

        .card {
            width: 100%;
            max-width: 500px;
            box-shadow: 0 4px 8px rgba(0, 0, 0, 0.1);
            border-radius: 8px;
            background-color: #fff;
        }

        .card-header {
            background-color: #007bff;
            color: #fff;
            border-bottom: none;
            border-radius: 8px 8px 0 0;
            padding: 15px;
            text-align: center;
        }

        .card-body {
            padding: 25px;
        }

        .form-label {
            margin-bottom: 10px;
            font-weight: bold;
        }

        .form-control {
            width: 100%;
            padding: 10px;
            margin-bottom: 20px;
            border: 1px solid #ced4da;
            border-radius: 4px;
            font-size: 16px;
        }

        .btn-primary {
            background-color: #007bff;
            border: none;
            color: #fff;
            padding: 12px;
            font-size: 16px;
            border-radius: 4px;
            cursor: pointer;
            width: 100%;
        }

        .btn-primary:hover {
            background-color: #0056b3;
        }
    </style>
</head>
<body>
<div class="container">
    <div class="card">
        <div class="card-header">
            <h4>Login</h4>
        </div>
        <div class="card-body">
            <form method="post" action="/perform_login">
                <div class="mb-3">
                    <label for="username" class="form-label">Username:</label>
                    <input type="text" class="form-control" id="username" name="username" required>
                </div>
                <div class="mb-3">
                    <label for="password" class="form-label">Password:</label>
                    <input type="password" class="form-control" id="password" name="password" required>
                </div>
                <div class="mb-3">
                    <label for="name" class="form-label">Name:</label>
                    <input type="text" class="form-control" id="name" name="name" required>
                </div>
                <div class="mb-3">
                    <label for="qualification" class="form-label">Qualification:</label>
                    <input type="text" class="form-control" id="qualification" name="qualification" required>
                </div>
                <div class="d-grid">
                    <button type="submit" class="btn btn-primary">Login</button>
                </div>
            </form>
        </div>
    </div>
</div>
</body>
</html>
Step 15: Create the Welcome Page
This page is displayed after successful authentication.
<!DOCTYPE html>
<html lang="en">
<head>
    <meta charset="UTF-8">
    <title>Title</title>
</head>
<body>
 <h1>Welcome User</h1>

</body>
</html>
Step 16: Run the Application
- Right Click Project
- Run 'SpringDisableSecurityDemoApplication'
After successfully completion of the spring project, run it as spring application and once it runs successfully, it starts at port 8080.
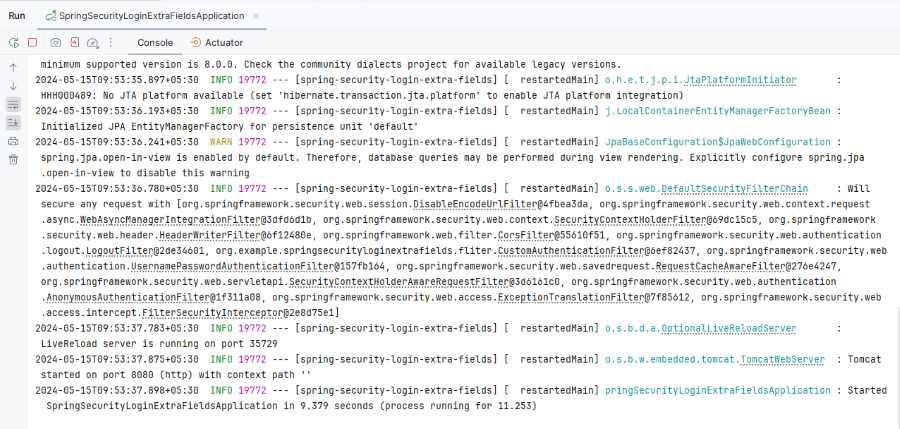
Open your browser and hit a below Url.
http://localhost:8080/register
Output:
Below is the Registration page.
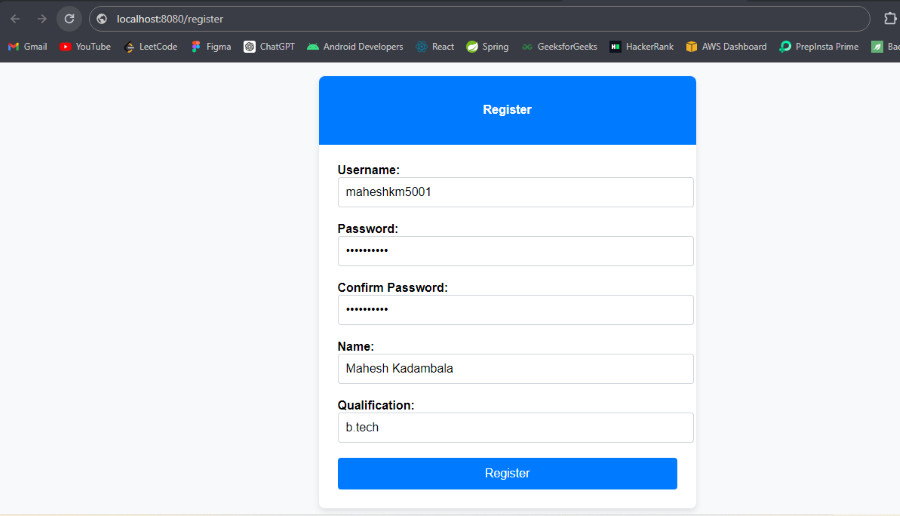
Enter the username, password, name and qualification for the register and these credentials can save into the database.
Login page:
http://localhost:8080/login
Output:
Below is the Login page.
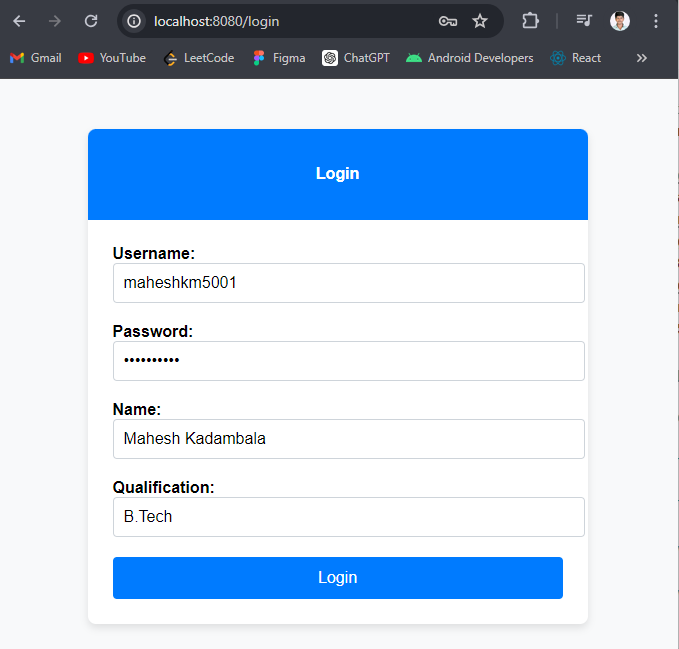
Enter the registered username, password, name and qualification. The custom authentication provider will be handle these additional fields during the authentication process.
Welcome page:
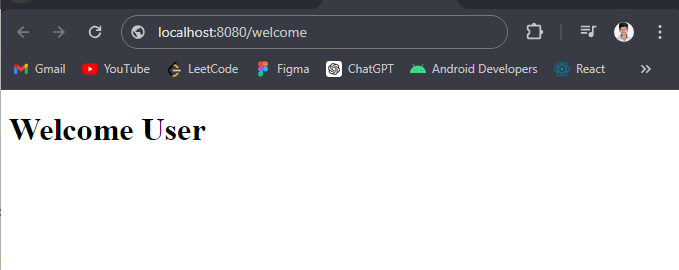
Explanation: This project demonstrates how to add the extra fields to the Spring Security login form that allows more customized and secure the authentication processes. By following these steps outlined in this article, we can enhance the Spring Boot application to meet specific authentication requirements.
