

Spring Security provides a flexible way to prevent brute force attacks by tracking failed login attempts and temporarily locking user accounts after a predefined number of unsuccessful logins. In this article, we will build a Spring Boot application that detects repeated login failures, blocks suspicious authentication attempts, and automatically unlocks users after a specific time period.
- Tracks failed login attempts for each user.
- Temporarily locks accounts after multiple failures.
- Automatically unlocks accounts after a defined duration
Importance of Preventing Brute Force Authentication Attempts
- Protects User Accounts from unauthorized login attempts.
- Prevents Password Guessing Attacks by limiting repeated login failures.
- Reduces Risk of Data Breaches caused by compromised accounts.
- Blocks Automated Bots that try thousands of password combinations.
- Improves Application Security by adding an extra defense layer.
- Protects Sensitive Information from unauthorized access.
Implementation of Prevent Brute Force Authentication Attempts
Step 1: Create a Spring Project
Create a new Spring project using spring Initializr. On creating the project, add the following dependencies.
Dependencies:
- Spring Web
- Spring Security
- Lombok
- Spring DevTools
- Spring Data JPA
- MySQL Driver
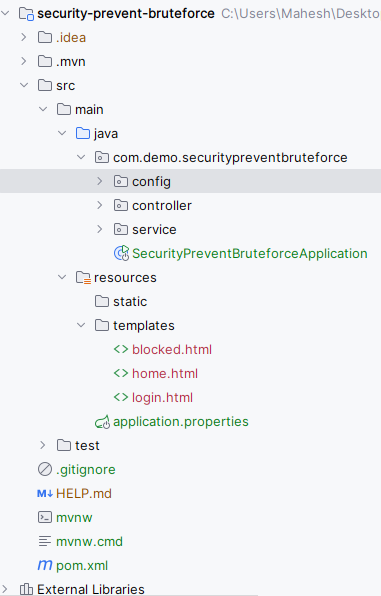
After creating the project, the folder structure will be like below image:
Step 2: Configure the Application Properties
Open the application.properties file and add the configuration for the MySQL database
spring.datasource.url=jdbc:mysql://localhost:3306/securityUser
spring.datasource.username=root
spring.datasource.password=spring.jpa.hibernate.ddl-auto=update
spring.jpa.show-sql=true
This configures the MySQL database connection and Hibernate properties.
Step 3: Create the SecurityConfig class
Create the SecurityConfig class that implements the security configuration of the Spring Boot application.
- Configures custom login page.
- Protects application endpoints.
package com.demo.securitypreventbruteforce.config;

import org.springframework.context.annotation.Bean;
import org.springframework.context.annotation.Configuration;
import org.springframework.security.config.annotation.web.builders.HttpSecurity;
import org.springframework.security.config.annotation.web.configuration.EnableWebSecurity;
import org.springframework.security.core.userdetails.User;
import org.springframework.security.core.userdetails.UserDetailsService;
import org.springframework.security.crypto.bcrypt.BCryptPasswordEncoder;
import org.springframework.security.crypto.password.PasswordEncoder;
import org.springframework.security.provisioning.InMemoryUserDetailsManager;
import org.springframework.security.web.SecurityFilterChain;

@Configuration
@EnableWebSecurity
public class SecurityConfig {

    private final CustomAuthenticationProvider authenticationProvider;

    public SecurityConfig(CustomAuthenticationProvider authenticationProvider) {
        this.authenticationProvider = authenticationProvider;
    }

    @Bean
    public SecurityFilterChain securityFilterChain(HttpSecurity http) throws Exception {
        http
                .authorizeRequests(authorizeRequests ->
                        authorizeRequests
                                .requestMatchers("/login", "/blocked").permitAll() // Allow access to login and blocked pages
                                .anyRequest().authenticated() // All other requests require authentication
                )
                .formLogin(formLogin ->
                        formLogin
                                .loginPage("/login").permitAll() // Use custom login page
                                .defaultSuccessUrl("/home", true) // Redirect to home on successful login
                )
                .logout(logout ->
                        logout.permitAll() // Allow logout for all users
                )
                .authenticationProvider(authenticationProvider); // Use custom authentication provider

        return http.build();
    }

    @Bean
    public PasswordEncoder passwordEncoder() {
        return new BCryptPasswordEncoder(); // Use BCrypt for password encoding
    }

    @Bean
    public UserDetailsService userDetailsService() {
        var userDetailsService = new InMemoryUserDetailsManager();
        var user = User.withUsername("user")
                .password(passwordEncoder().encode("password"))
                .roles("USER")
                .build();
        userDetailsService.createUser(user);
        return userDetailsService; // Set up in-memory user details service
    }
}
Step 4: Create the CustomAuthenticationProvider class
Create the CustomAuthenticationProvider class that implements custom authentication logic.
- Handles custom authentication logic.
- Checks whether a user is locked.
package com.demo.securitypreventbruteforce.config;

import com.demo.securitypreventbruteforce.service.BruteForceProtectionService;
import org.springframework.beans.factory.annotation.Autowired;
import org.springframework.security.authentication.BadCredentialsException;
import org.springframework.security.authentication.UsernamePasswordAuthenticationToken;
import org.springframework.security.core.Authentication;
import org.springframework.security.core.AuthenticationException;
import org.springframework.security.core.userdetails.User;
import org.springframework.security.core.userdetails.UserDetailsService;
import org.springframework.security.crypto.password.PasswordEncoder;
import org.springframework.security.authentication.AuthenticationProvider;
import org.springframework.stereotype.Component;

@Component
public class CustomAuthenticationProvider implements AuthenticationProvider {

    @Autowired
    private UserDetailsService userDetailsService;

    @Autowired
    private PasswordEncoder passwordEncoder;

    @Autowired
    private BruteForceProtectionService bruteForceProtectionService;

    @Override
    public Authentication authenticate(Authentication authentication) throws AuthenticationException {
        String username = authentication.getName();
        String password = (String) authentication.getCredentials();

        // Check if the user is blocked due to too many failed login attempts
        if (bruteForceProtectionService.isBlocked(username)) {
            throw new BadCredentialsException("You have been temporarily locked due to too many failed login attempts.");
        }

        User user = (User) userDetailsService.loadUserByUsername(username);

        // Verify user credentials
        if (user == null || !passwordEncoder.matches(password, user.getPassword())) {
            bruteForceProtectionService.loginFailed(username); // Record failed login attempt
            throw new BadCredentialsException("Invalid username or password.");
        }

        bruteForceProtectionService.loginSucceeded(username); // Record successful login
        return new UsernamePasswordAuthenticationToken(username, password, user.getAuthorities());
    }

    @Override
    public boolean supports(Class<?> authentication) {
        return UsernamePasswordAuthenticationToken.class.isAssignableFrom(authentication);
    }
}
Step 5: Create the BruteForceProtectionService Class
Create the BruteForceProtectionService class to handle tracking and blocking of failed login attempts.
- Automatically removes expired locks.
- Resets counters after successful login.
package com.demo.securitypreventbruteforce.service;

import org.springframework.stereotype.Service;

import java.util.concurrent.ConcurrentHashMap;
import java.util.concurrent.TimeUnit;
import java.util.Map;

@Service
public class BruteForceProtectionService {

    private static final int MAX_ATTEMPT = 5;
    private static final long LOCK_TIME = TimeUnit.MINUTES.toMillis(15);

    private final Map<String, Integer> attemptsCache = new ConcurrentHashMap<>();
    private final Map<String, Long> lockCache = new ConcurrentHashMap<>();

    public void loginSucceeded(String key) {
        attemptsCache.remove(key); // Clear failed attempts on successful login
        lockCache.remove(key); // Unlock user on successful login
    }

    public void loginFailed(String key) {
        int attempts = attemptsCache.getOrDefault(key, 0);
        attempts++;
        attemptsCache.put(key, attempts);
        if (attempts >= MAX_ATTEMPT) {
            lockCache.put(key, System.currentTimeMillis()); // Lock user if max attempts exceeded
        }
    }

    public boolean isBlocked(String key) {
        if (!lockCache.containsKey(key)) {
            return false;
        }

        long lockTime = lockCache.get(key);
        if (System.currentTimeMillis() - lockTime > LOCK_TIME) {
            lockCache.remove(key); // Remove lock if lock time has expired
            return false;
        }

        return true; // User is still locked
    }
}
Step 6: Create the AuthController Class
Create the AuthController class to handle login requests.
- Handles login page requests.
- Returns the login view.
package com.demo.securitypreventbruteforce.controller;

import org.springframework.stereotype.Controller;
import org.springframework.web.bind.annotation.GetMapping;

@Controller
public class AuthController {

    @GetMapping("/login")
    public String login() {
        return "login"; // Return login view
    }
}
This controller handles the GET request for the login page.
Step 7: Create the HomeController Class
Create the HomeController class to handle home and blocked pages.
- Displays the home page after successful login.
- Displays account lock notification page
package com.demo.securitypreventbruteforce.controller;

import org.springframework.stereotype.Controller;
import org.springframework.ui.Model;
import org.springframework.web.bind.annotation.GetMapping;

@Controller
public class HomeController {

    @GetMapping("/home")
    public String home(Model model) {
        return "home"; // Return home view
    }

    @GetMapping("/blocked")
    public String blocked(Model model) {
        return "blocked"; // Return blocked view
    }
}
This controller handles the GET requests for the home and blocked pages.
Step 8: Main Class
No changes are required in the main class.
package com.demo.securitypreventbruteforce;

import org.springframework.boot.SpringApplication;
import org.springframework.boot.autoconfigure.SpringBootApplication;

@SpringBootApplication
public class SecurityPreventBruteforceApplication {

    public static void main(String[] args) {
        SpringApplication.run(SecurityPreventBruteforceApplication.class, args);
    }

}
This is the main entry point for the Spring Boot application.
Step 9: Create the Login HTML page
Create the login.html page for the login view.
<!DOCTYPE html>
<html xmlns:th="https://www.thymeleaf.org/">
<head>
    <title>Login</title>
    <link rel="stylesheet" href="https://stackpath.bootstrapcdn.com/bootstrap/4.5.2/css/bootstrap.min.css">
    <style>
        body {
            background-color: #f5f5f5;
            font-family: Arial, sans-serif;
        }
        .login-container {
            max-width: 400px;
            margin: 0 auto;
            padding-top: 100px;
        }
        .card {
            border: 1px solid #e0e0e0;
            box-shadow: 0 2px 4px rgba(0, 0, 0, 0.1);
        }
        .card-header {
            background-color: lightgreen;
            color: white;
        }
        .btn-primary {
            background-color: lightgreen;
            border-color: lightgreen;
        }
        .btn-primary:hover {
            background-color: #32cd32;
            border-color: #32cd32;
        }
    </style>
</head>
<body>
<div class="login-container">
    <div class="card">
        <div class="card-header text-center">
            <h3>Login</h3>
        </div>
        <div class="card-body">
            <form th:action="@{/login}" method="post">
                <div class="form-group">
                    <label for="username">Username:</label>
                    <input type="text" class="form-control" id="username" name="username" required>
                </div>
                <div class="form-group">
                    <label for="password">Password:</label>
                    <input type="password" class="form-control" id="password" name="password" required>
                </div>
                <div class="form-group text-center">
                    <button type="submit" class="btn btn-primary btn-block">Login</button>
                </div>
            </form>
        </div>
    </div>
</div>
<script src="https://code.jquery.com/jquery-3.5.1.slim.min.js"></script>
<script src="https://cdn.jsdelivr.net/npm/@popperjs/core@2.9.2/dist/umd/popper.min.js"></script>
<script src="https://stackpath.bootstrapcdn.com/bootstrap/4.5.2/js/bootstrap.min.js"></script>
</body>
</html>
This HTML page creates a simple login form with Bootstrap styling.
Step 10: Create the Home HTML page
Create the home.html page for the home page
<!DOCTYPE html>
<html xmlns:th="https://www.thymeleaf.org/">
<head>
    <title>Home</title>
    <link rel="stylesheet" href="https://stackpath.bootstrapcdn.com/bootstrap/4.5.2/css/bootstrap.min.css">
    <style>
        body {
            background-color: #f5f5f5;
            font-family: Arial, sans-serif;
        }
        .home-container {
            max-width: 400px;
            margin: 0 auto;
            padding-top: 100px;
        }
        .card {
            border: 1px solid #e0e0e0;
            box-shadow: 0 2px 4px rgba(0, 0, 0, 0.1);
        }
        .card-header {
            background-color: lightgreen;
            color: white;
        }
    </style>
</head>
<body>
<div class="home-container">
    <div class="card">
        <div class="card-header text-center">
            <h3>Welcome Home</h3>
        </div>
        <div class="card-body">
            <p>Welcome! You have successfully logged in.</p>
        </div>
    </div>
</div>
</body>
</html>
The home.html page displays a welcome message upon successful login. It uses Bootstrap for styling and includes a card component with a header and body to present the message.
Step 11: Create the Block HTML page
Go to src > main > resources > templates > block.html and put the below HTML code.
<!DOCTYPE html>
<html xmlns:th="https://www.thymeleaf.org/">
<head>
    <title>Account Locked</title>
    <link rel="stylesheet" href="https://stackpath.bootstrapcdn.com/bootstrap/4.5.2/css/bootstrap.min.css">
    <style>
        body {
            background-color: #f5f5f5;
            font-family: Arial, sans-serif;
        }
        .blocked-container {
            max-width: 400px;
            margin: 0 auto;
            padding-top: 100px;
        }
        .card {
            border: 1px solid #e0e0e0;
            box-shadow: 0 2px 4px rgba(0, 0, 0, 0.1);
        }
        .card-header {
            background-color: lightgreen;
            color: white;
        }
    </style>
</head>
<body>
<div class="blocked-container">
    <div class="card">
        <div class="card-header text-center">
            <h3>Account Locked</h3>
        </div>
        <div class="card-body">
            <p>Your account has been temporarily locked due to too many failed login attempts. Please try again later.</p>
        </div>
    </div>
</div>
</body>
</html>
The block.html page informs the user that their account has been temporarily locked due to too many failed login attempts. It also uses Bootstrap for styling and displays the message in a card component.
Step 12: Run the application
Run the application, which will start on port 8080.

Step 13: Testing the Application
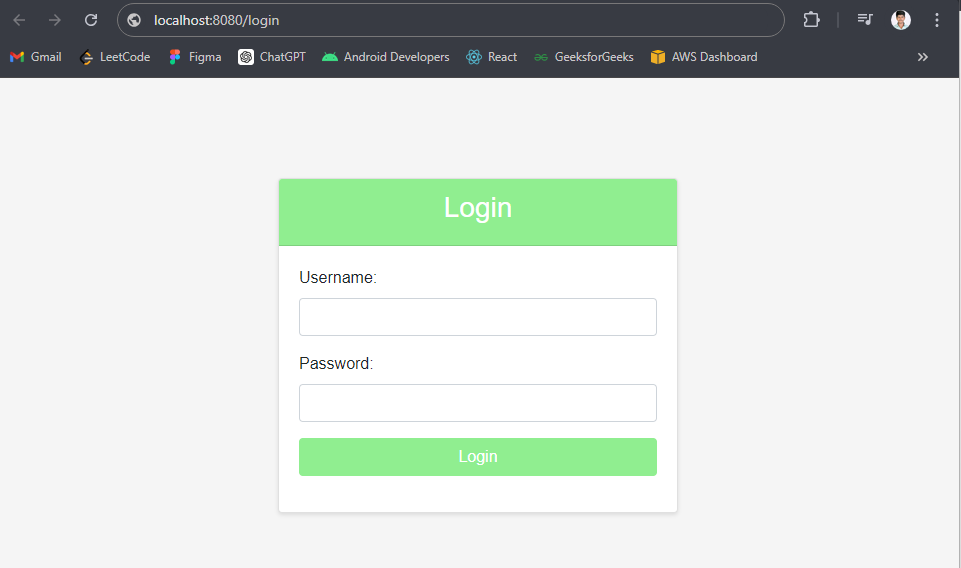
Login Page:
Navigate to http://localhost:8080/login. If the credentials are correct, it will redirect to the home page.
http://localhost:8080/login
Output:
Home Page:
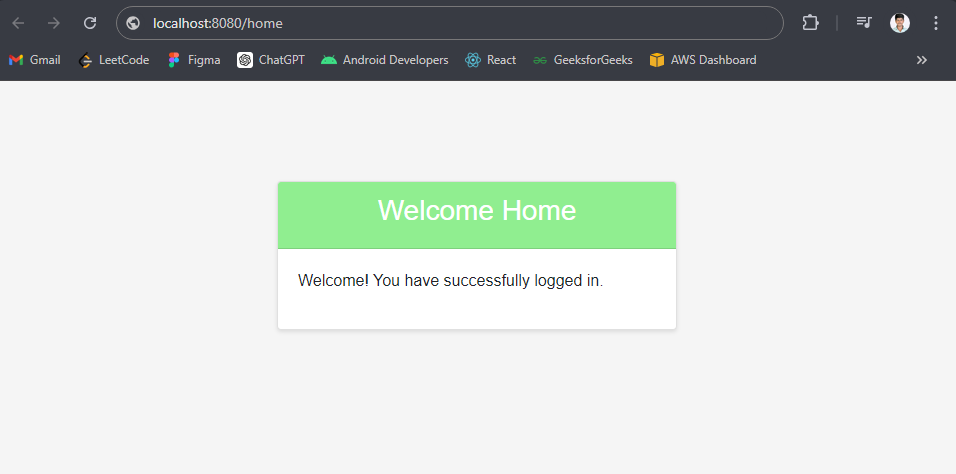
Navigate to http://localhost:8080/home to view the home page after successful login.
http://localhost:8080/home
Output:
If you are trying multiple times, then your account will be temporarily blocked.
Blocked Page:
If multiple failed login attempts are made, the account will be temporarily locked, and the user will be redirected to http://localhost:8080/block.
http://localhost:8080/block
Output:

