Spring Boot is a framework built on top of the Spring Framework that simplifies the creation of stand-alone, production-ready Spring applications. It minimizes boilerplate configuration and automates the setup of common Spring components.
In this article, we will go through the step-by-step process of setting up a Spring Boot project using Gradle, a powerful and flexible build automation tool used for dependency management and project builds.
Build Tools & Gradle
1. Build Tool
A build tool automates the process of transforming source code into an executable application. It performs tasks such as:
- Compiling code
- Managing dependencies
- Running tests
- Packaging and deploying applications
2. Gradle
Gradle is a widely used build automation tool that supports multiple languages, including Java, Groovy, and Kotlin. It is known for:
- Incremental and efficient builds
- Support for both Maven and Ivy repositories
- Flexibility through Groovy or Kotlin DSL
Gradle is commonly used in large-scale Java and Spring Boot projects because of its advanced dependency management and customizable build pipelines.
Setting Up a Spring Boot Project Using Gradle
Before starting, ensure that Java is installed. Run the following command in the terminal:
java --version
This tutorial uses Java 21, but any version above Java 8 works as long as it’s compatible with the Spring Boot version you select.
Step-by-step Implementation
Step 1: Generate a Spring Boot Project
1. Go to Spring Initializr.
2. Configure the following:
- Project: Gradle – Groovy
- Language: Java
- Spring Boot Version: 3.3.2 (or latest)
- Group: com.geeksforgeeks
- Artifact: springbootgradledemo
- Packaging: Jar
- Java Version: 21
- Dependencies:
Spring Web

Click Generate, then extract the ZIP file and open it in your IDE.
Step 2: Explore the Gradle Project Structure
A typical Spring Boot Gradle project contains the following structure:
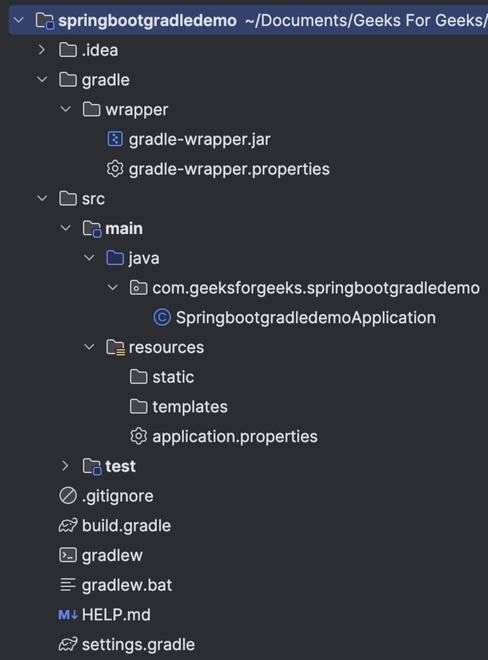
Important Files
1. settings.gradle
Specifies the root project name and sub-projects.
rootProject.name = 'springbootgradledemo'
To include subprojects:
include("my_sub_project")
2. build.gradle
The build.gradle file defines plugins, dependencies, repositories, and build configurations. It’s similar in purpose to Maven’s pom.xml.
plugins {
id 'java'
id 'org.springframework.boot' version '3.3.2'
id 'io.spring.dependency-management' version '1.1.6'
}
group = 'com.geeksforgeeks'
version = '0.0.1-SNAPSHOT'
java {
toolchain {
languageVersion = JavaLanguageVersion.of(21)
}
}
repositories {
mavenCentral()
}
dependencies {
implementation 'org.springframework.boot:spring-boot-starter-web'
testImplementation 'org.springframework.boot:spring-boot-starter-test'
testRuntimeOnly 'org.junit.platform:junit-platform-launcher'
}
tasks.named('test') {
useJUnitPlatform()
}
3. Plugins:
Plugins extend Gradle’s functionality by enabling specific build features.
plugins {
id 'java'
id 'org.springframework.boot' version '3.3.2'
id 'io.spring.dependency-management' version '1.1.6'
}
- Core plugins like id 'java' are built-in to Gradle.
- Community plugins such as id 'org.springframework.boot' are maintained externally.
4. Java Version:
Specifies the Java toolchain version used to build the project.
java {
toolchain {
languageVersion = JavaLanguageVersion.of(21)
}
}
5. Repositories
Repositories define where Gradle should fetch dependencies from.
repositories {
mavenCentral()
}
If you work in an organization, you can configure a custom repository or internal artifact server instead.
6. Dependencies:
Dependencies are external libraries your application needs for compilation, execution, and testing.
dependencies {
implementation 'org.springframework.boot:spring-boot-starter-web'
testImplementation 'org.springframework.boot:spring-boot-starter-test'
testRuntimeOnly 'org.junit.platform:junit-platform-launcher'
}
7. Tasks:
A task represents a specific action that Gradle executes during the build lifecycle.
tasks.named('test') {
useJUnitPlatform()
}
This tells Gradle to use JUnit Platform for test execution.
8. gradle folder:
Contains scripts and files that manage the Gradle wrapper, ensuring consistent Gradle versions across environments.
Step 3: Create a Simple REST API
Now, let’s add a simple REST controller.
File:
src/main/java/com/geeksforgeeks/springbootgradledemo/HelloController.java
package com.geeksforgeeks.springbootgradledemo;

import org.springframework.web.bind.annotation.GetMapping;
import org.springframework.web.bind.annotation.RequestMapping;
import org.springframework.web.bind.annotation.RestController;

@RestController
@RequestMapping("/api")
public class HelloController {

    @GetMapping("/hello")
    public String sayHello() {
        return "Hello World";
    }
}
This defines a GET API endpoint /api/hello that returns a simple message.
Step 4: Run the Application
Run the following command from the project root directory:
./gradlew bootRun
If everything is configured properly, you should see output indicating that the application started successfully.
Output:
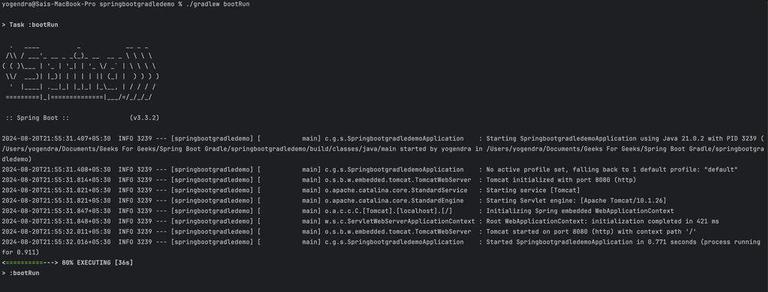
Open your browser and navigate to:
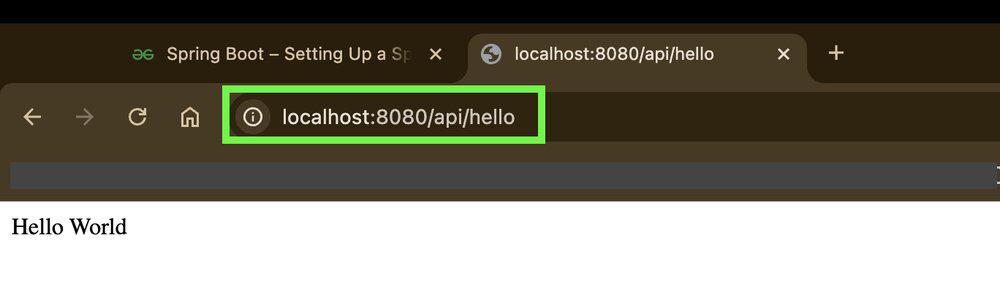
http://localhost:8080/api/hello
Response: