

A Kali Linux persistent USB allows you to carry a fully functional, portable cybersecurity lab in your pocket. Persistence allows a Live USB to:
- Save installed tools and updates
- Retain files and downloads
- Remember system configurations
- Preserve user preferences across reboots
Without persistence, Kali runs in Live mode and resets everything after shutdown.
System Requirements
Before proceeding, ensure you have:
- USB Drive (Minimum 16GB, Recommended 32GB)
- A working computer (Windows, Linux, or macOS)
- Latest Kali Linux Live ISO
- Bootable USB tool:
- Rufus (Windows)
- balenaEtcher (macOS/Linux)
You can download the ISO from the official website of Offensive Security.
Step-by-Step: Install Kali Linux with Persistence
The below-mentioned steps can be used to install Kali Linux persistently on a USB drive, which also allows the users to keep the installed applications, files, and preferences even after reboots.
Step 1: Download Kali Linux ISO
- Visit the official Kali Linux website.
- Navigate to the Downloads section.
- Under the Live category, download the latest 64-bit ISO (recommended for modern systems).
- Save the file to your computer.

Step 2: Download Official Rufus
- Go to Rufus' Official website > Download it to create a bootable USB drive

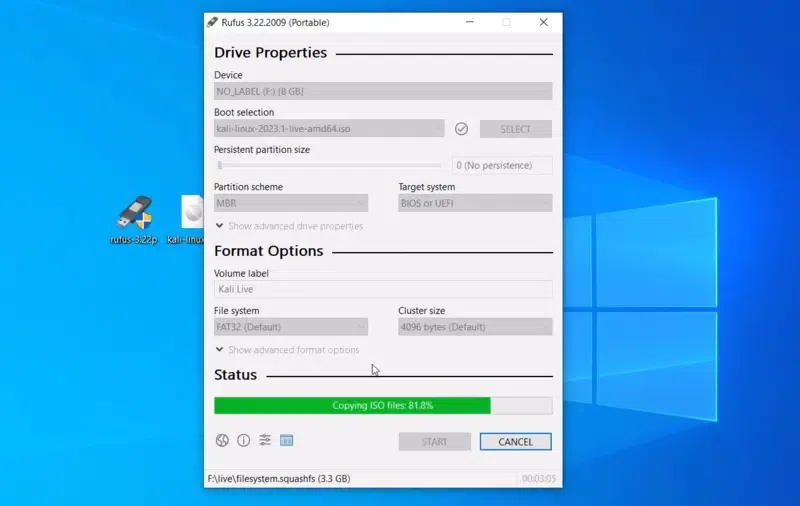
Step 3: Configure a system Bootable USB
- Insert your USB drive.
- Open Rufus.
- Under Device, select your USB drive.
- Under Boot Selection, choose the Kali Linux ISO.
- Partition scheme:
- Select MBR (works for BIOS & UEFI systems).
- File system:
- Choose FAT32.
- Click Start.
- If prompted, choose ISO Image mode.
Wait for the flashing process to complete.
Step 4: Boot from the USB Drive
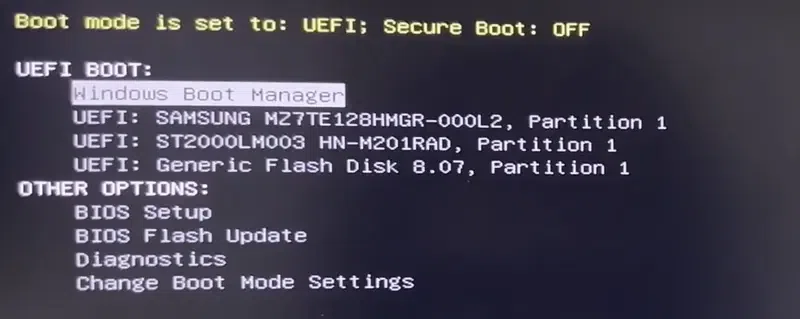
- Restart your system.
- Enter Boot Menu (usually F10, F12, ESC, or DEL depending on system).
- Select the USB drive.
- From the Kali boot menu, choose: Live system (persistence)
If persistence isn’t visible yet, don’t worry, we’ll configure it next.
Step 5: Run Kali Linux from the configured USB Drive
- Choose the "Live System with USB persistence" option > Tap on Enter > Enter Password and Connect.

Also Read
