

In Spring MVC, a DELETE request is used to remove existing data from the server. It is commonly used in CRUD applications when a user wants to delete a record from a database or collection. Spring MVC provides the @DeleteMapping annotation to handle HTTP DELETE requests.
- @DeleteMapping is used to handle HTTP DELETE requests.
- DELETE requests are commonly used to remove resources from the server.
- Path variables can be used to identify which record should be deleted.
- DELETE requests are frequently tested using Postman or REST clients.
Syntax
Using @DeleteMapping with Path Variable
@DeleteMapping("/delete/{id}")
public String deleteUser(@PathVariable int id)
return "User Deleted";
}
- @DeleteMapping: Maps HTTP DELETE requests to a controller method.
- @PathVariable: Extracts values from the URL and passes them to the method.
DELETE Request Processing Flow in Spring MVC
- Client (Postman) sends a DELETE request.
- DispatcherServlet receives the request.
- DispatcherServlet identifies the appropriate Controller method.
- Controller handles the request using @DeleteMapping.
- Business logic deletes the required resource.
- Controller returns a response message.
- DispatcherServlet sends the response back to the client.
- Client receives the response.
Steps to Implement DELETE Request in Spring MVC
In this example, we will create a simple Spring MVC application that deletes a user using the @DeleteMapping annotation.
Step 1: Create a Maven Project
- Open STS IDE.
- Click File - New - Maven Project
- Select Create a Simple Project and select Archetypes
- Click Next

Enter the following details:
- Group Id: com.gfg
- Artifact Id: SpringMVCJSTLForEachExample
- Packaging: war
Click Finish.
Step 2: Add Required Dependencies
Add Spring MVC, Servlet API, and JSTL dependencies to the pom.xml file.
<dependencies>

    <dependency>
        <groupId>org.springframework</groupId>
        <artifactId>spring-webmvc</artifactId>
        <version>5.3.18</version>
    </dependency>

    <dependency>
        <groupId>javax.servlet</groupId>
        <artifactId>javax.servlet-api</artifactId>
        <version>4.0.1</version>
        <scope>provided</scope>
    </dependency>

</dependencies>
Step 3: Create Model Class
This class represents user data.
package com.gfg.model;

public class User {

    private int id;
    private String name;

    public User() {
    }

    public User(int id, String name) {
        this.id = id;
        this.name = name;
    }

    public int getId() {
        return id;
    }

    public void setId(int id) {
        this.id = id;
    }

    public String getName() {
        return name;
    }

    public void setName(String name) {
        this.name = name;
    }
}
Step 4: Configure DispatcherServlet
This class initializes the Spring MVC application and registers DispatcherServlet.
package com.gfg.config;

import org.springframework.web.servlet.support.
AbstractAnnotationConfigDispatcherServletInitializer;

public class AppInitializer
        extends AbstractAnnotationConfigDispatcherServletInitializer {

    @Override
    protected Class<?>[] getRootConfigClasses() {
        return null;
    }

    @Override
    protected Class<?>[] getServletConfigClasses() {
        return new Class[] { AppConfig.class };
    }

    @Override
    protected String[] getServletMappings() {
        return new String[] { "/" };
    }
}
Step 5: Create Spring Configuration Class
This class enables Spring MVC configuration.
package com.gfg.config;

import org.springframework.context.annotation.ComponentScan;
import org.springframework.context.annotation.Configuration;
import org.springframework.web.servlet.config.annotation.EnableWebMvc;

@Configuration
@EnableWebMvc
@ComponentScan(basePackages = "com.gfg.controller")
public class AppConfig {

}
Step 6: Create Controller
This controller handles DELETE requests and removes users from the collection.
package com.gfg.controller;

import org.springframework.stereotype.Controller;
import org.springframework.ui.Model;
import org.springframework.web.bind.annotation.GetMapping;
import org.springframework.web.bind.annotation.PathVariable;

@Controller
public class UserController {

    @GetMapping("/")
    public String showHomePage() {
        return "home";
    }

    @GetMapping("/delete/{id}")
    public String deleteUser(
            @PathVariable int id,
            Model model) {

        // Delete Logic

        model.addAttribute(
                "message",
                "User with ID " + id
                        + " deleted successfully");

        return "success";
    }
}
Step 7: Create Home Page (home.jsp)
This JSP page displays the user interface and provides a link to initiate the delete request.
<html>
<head>
<title>Delete User</title>
</head>
<body>

<h2>Delete User Example</h2>

<a href="delete/101">
    Delete User 101
</a>

</body>
</html>
Step 8: Create Result Page (success.jsp)
This JSP page displays the confirmation message after the delete operation is completed successfully.
<html>
<head>
<title>Delete Success</title>
</head>
<body>

<h2>${message}</h2>

</body>
</html>
Step 9: Run the Application
- Right Click Project
- Run As - Run on Server
- Select Apache Tomcat
- Click Finish
Open browser:
http://localhost:8080/SpringMVCDeleteRequest
Output:
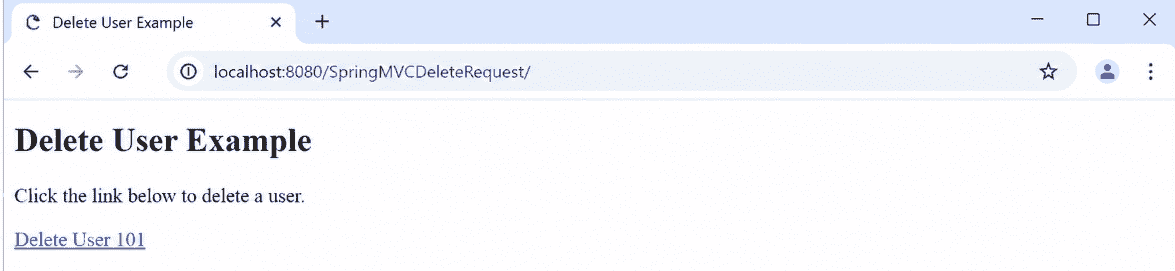
After Clicking "Delete User 101" User sends a DELETE request.
http://localhost:8080/SpringMVCDeleteRequest/delete/101
Result page displaying the successful deletion message.
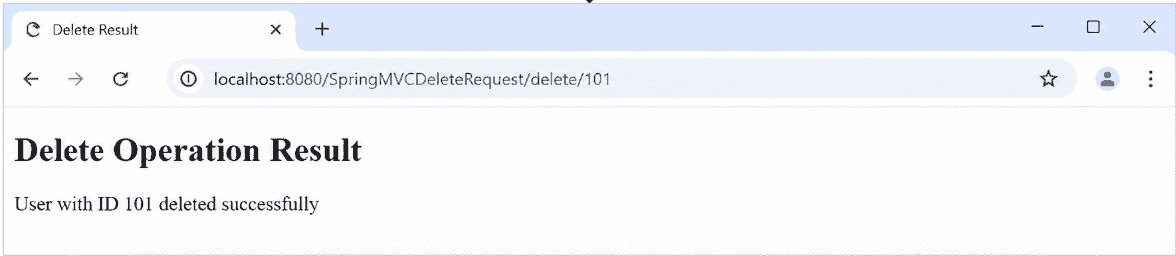
Explanation: In this application, the client sends a DELETE request containing the user ID in the URL. Spring MVC maps the request to the controller method using the @DeleteMapping annotation and retrieves the ID using @PathVariable. The controller deletes the matching user from the collection and returns a confirmation message to the client. This demonstrates how Spring MVC handles DELETE operations for removing resources.
