

In Spring applications, hardcoding values inside XML configuration files makes the application difficult to maintain and configure for different environments. Instead, Spring allows these values to be stored in an external properties file and loaded dynamically at runtime.
- Stores configuration values in an external properties file.
- Avoids hardcoding values inside XML configuration.
- Makes applications easier to maintain across different environments.
Loading literal values from a properties file improves maintainability, reusability, and flexibility because configuration values can be modified without changing the application source code
Need for a Properties File
Without a properties file:
- Values are hardcoded inside beans.xml.
- Every configuration change requires editing XML.
- Difficult to manage multiple environments.
With a properties file:
- Configuration values are stored separately.
- XML remains clean.
- Changing values requires editing only the properties file.
Steps to Load Literal Values from Properties File
Follow these steps to load a literal values from Properties file.
Step 1: Create a Maven Project
- Open STS IDE / ECLIPSE IDE
- Click File -> New -> Maven Project.

Select Create a simple project (Select Archetype ) and click Next.
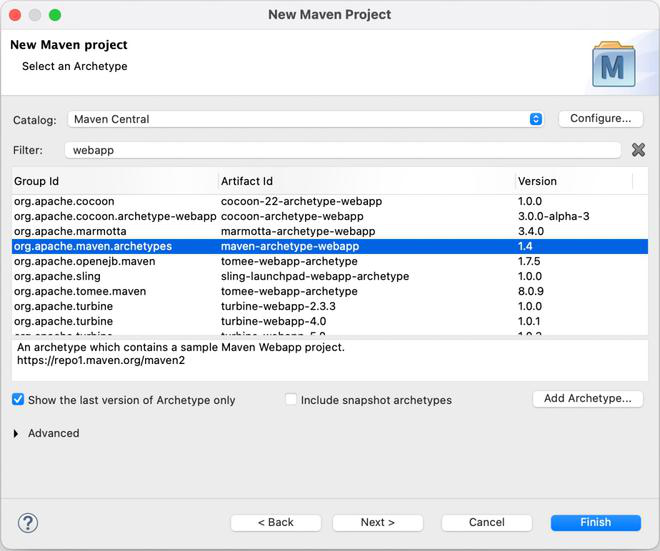
Then Enter the following details:
- Group Id: com.gfg
- Artifact Id: SpringMVCTiles
- Packaging: war
Click Finish.
Below is the final project structure of the Spring MVC project in the below image.
Step 2: Create the Bean Class (Student.java)
Create a Student class containing the student properties and setter methods.
// Java Program to Illustrate Student Class

// Class
public class Student {

    // Class data members
    private int rollNo;
    private String name;
    private int age;

    // Getters and setters

    public void setRollNo(int rollNo)
    {
        this.rollNo = rollNo;
    }

    public void setName(String name)
    {

        // This keyword refers to current instance itself
        this.name = name;
    }

    public void setAge(int age) { this.age = age; }

    // Method
    public void display()
    {
        System.out.println("Roll No: " + rollNo);
        System.out.println("Name: " + name);
        System.out.println("Age: " + age);
    }
}
Step 3: Configure Bean with Static Values (beans.xml)
Initially configure the bean using static literal values.
<?xml version="1.0" encoding="UTF-8"?>
<beans xmlns="http://www.springframework.org/schema/beans/"
    xmlns:xsi="https://www.w3.org/2001/XMLSchema-instance"
    xsi:schemaLocation="http://www.springframework.org/schema/beans/
    https://www.springframework.org/schema/beans/spring-beans.xsd">

    <bean id="student" class="Student">
        <property name="rollNo" value="101"/>
        <property name="name" value="Sagar"/>
        <property name="age" value="20"/>
    </bean>

</beans>
Step 4: Create the Main Class
Load the Spring container, retrieve the bean, and display the values.
// Java Program to Illustrate Application File

// Importing required classes
import org.springframework.context.ApplicationContext;
import org.springframework.context.support.ClassPathXmlApplicationContext;

// Application class
public class Main {

    // Main driver method
    public static void main(String[] args)
    {
        // Implementing Spring IoC
        // using ApplicationContext
        ApplicationContext context
            = new ClassPathXmlApplicationContext(
                "beans.xml");

        // Getting the bean student
        Student student
            = context.getBean("student", Student.class);

        // Calling the methods
        // inside main() method
        student.display();
    }
}
Step 5: Create the Properties File (student-info.properties)
This file stores all configurable values separately from the XML configuration.
student.rollNo=101
student.name=Sagar
student.age=20
Step 6: Configure Spring Beans (beans.xml)
The context:property-placeholder element loads the values from the properties file, and ${} placeholders inject those values into the Student bean.
Example: File: beans.xml
<?xml version="1.0" encoding="UTF-8"?>
<beans xmlns="http://www.springframework.org/schema/beans/"
       xmlns:xsi="https://www.w3.org/2001/XMLSchema-instance"
       xmlns:context="http://www.springframework.org/schema/context/"
       xsi:schemaLocation="http://www.springframework.org/schema/beans/
        https://www.springframework.org/schema/beans/spring-beans.xsd
        http://www.springframework.org/schema/context/
        https://www.springframework.org/schema/context/spring-context.xsd">

    <context:property-placeholder location="classpath:student-info.properties"/>

    <bean id="student" class="Student">
        <property name="rollNo" value="${student.rollNo}"/>
        <property name="name" value="${student.name}"/>
        <property name="age" value="${student.age}"/>
    </bean>

</beans>
Step 7: Run the Application
Run the Main.java file
Output:
Roll No: 101
Name: Sagar
Age: 20
