

Socket.io is a JavaScript library that enables real-time, bidirectional, event-based communication between the client and server. It works on top of WebSocket but provides additional features like automatic reconnection, broadcasting, and fallback options.
Features of the Chat App
Create a real-time chat application using Socket.IO and Node.js. The application will feature
- Real-time communication between multiple users without the need for page reloads.
- Sending and receiving messages in real-time, instantly displaying messages across all connected clients.
- A simple and responsive chat interface built using HTML, CSS (Tailwind CSS), and JavaScript.
- Broadcasting messages to all clients in a chat room.
- Customization for both the username and the message body.
- A fully functional system where users can see messages as they are typed and sent in real-time.
Approach
Defines the implementation strategy for enabling real-time chat functionality using Socket.IO and Node.js.
- Real-time communication: Use Socket.IO to establish bidirectional communication between client and server.
- Server setup: Configure an Express.js server to handle connections and serve the client interface.
- Message handling: Emit and listen for events to send and receive messages between clients via the server.
- UI updates: Dynamically update the frontend upon receiving new messages without page reload.
- Multi-user support: Utilize broadcasting to deliver messages to all connected clients in real time.
Setting Up Node.js Chat App Project
Creating a new folder called socket-chat-app. Open your command prompt and navigate to the folder we just created.
Step 1: Create Project Directory
mkdir chat-app && cd chat-app
npm init -y
Step 2: Initialize Node.js Project
Now, Initialize the node package by typing in the following command in the terminal:
npm init -yStep 3: Install Dependencies
This will create a package.json file for us so that we can install the necessary libraries. Now type in the command:
npm install express socket.ioStep 4: Create Project Files
Now, in the socket-chat-app folder, create two files - index.html and index.js:
touch index.html index.jsProject Structure
Folder structure should look like this:
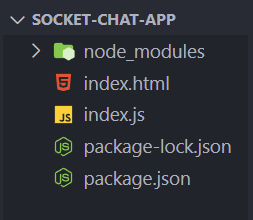
The implementation of the above approach to creating a real-time chat application using socket.io and Node.js:
- HTML form with input fields for user name and message.
- Socket.io client library included using <script src="/socket.io/socket.io.js"></script>
- Initializes connection using let socket = io();
- Handles form submission and emits send name and send message events.
- Listens for send name and send message events to display messages.
- Uses Tailwind CSS CDN for styling.
<html>
<head>
    <title>Chat app using Socket IO and Node JS</title>
    <script src="https://cdn.tailwindcss.com/3.4.17"></script>
</head>

<body>
    <h1 class="font-bold text-green-500
               text-3xl text-center mt-5">
          GeeksforGeeks
      </h1>
    <div>
        <h2 class="font-semibold text-xl
                   text-center mt-5"
            id="logo">
              Chat App using Socket io
          </h2>
    </div>
    <form class="flex flex-col justify-center
                 items-center mt-5"
          id="form">
        <input class="border border-gray-400
                      rounded-md mt-5 p-1"
               type="text"
               placeholder="Name"
               id="myname">
        <input class="border border-gray-400
                      rounded-md mt-5 p-1"
               type="text"
               placeholder="Message"
               id="message">
        <button class="bg-blue-500 rounded-md p-2
                       text-white mt-5">
              Send
          </button>
    </form>
    <div class="flex flex-col justify-center
                items-center mt-5"
         id="messageArea">
    </div>
</body>
<script src="/socket.io/socket.io.js"></script>
<script>
    let socket = io();
    let form = document.getElementById('form');
    let myname = document.getElementById('myname');
    let message = document.getElementById('message');
    let messageArea = document.getElementById("messageArea");
    form.addEventListener("submit", (e) => {
        e.preventDefault();
        if (message.value) {
            socket.emit('send name', myname.value);
            socket.emit('send message', message.value);
            message.value = "";
        }
    });
    socket.on("send name", (username) => {
        let name = document.createElement("p");
        name.style.backgroundColor = "grey";
        name.style.width = "100%";
        name.style.textAlign = "center";
        name.style.color = "white";
        name.textContent = username + ":";
        messageArea.appendChild(name);
    });
    socket.on("send message", (chat) => {
        let chatContent = document.createElement("p");
        chatContent.textContent = chat;
        messageArea.appendChild(chatContent);
    });
</script>

</html>
const express = require('express');
const app = express();
const { Server } = require('socket.io');
const http = require('http');
const server = http.createServer(app);
const io = new Server(server);
const port = 5000;

app.get('/', (req, res) => {
    res.sendFile(__dirname + '/index.html');
});

io.on('connection', (socket) => {
    socket.on('send name', (username) => {
        io.emit('send name', (username));
    });

    socket.on('send message', (chat) => {
        io.emit('send message', (chat));
    });
});

server.listen(port, () => {
    console.log(`Server is listening at the port: ${port}`);
});
- Express Web Server: The code uses Express to create a basic web server and an HTTP server with the http module.
- Serving HTML: When users visit the root URL (/), the server sends index.html to the client.
- Socket.IO Integration: Socket.IO enables real-time communication between the server and client.
- Event Handling: The server listens for two events from the client: send name and send message, emitting these to all connected clients.
- Server Setup: The server runs on port 5000 and logs a message when it starts, indicating it's ready for connections.
Steps to run the application: Write the below code in the terminal to run the server
node index.jsOutput: Open your browser and open two tabs with the URL: http://localhost:5000 so that we have two clients that can chat with each other. Following is the output of our chat app:
