Spring MVC is a widely used framework that helps build structured web applications using the Model-View-Controller pattern. It simplifies request handling and application flow using plain Java classes. In this guide, you will learn how to create and run your first Spring MVC controller in Eclipse/Spring Tool Suite.
- Uses DispatcherServlet to manage and route incoming requests
- Supports view technologies like JSP or Thymeleaf for UI rendering
- Allows easy data sharing between controller and view using Model objects
Key Concepts in Spring MVC
- Model: The Model represents the application's data. It can be a Java object or a collection of objects that stores and transfers information between the controller and the view.
- View: The View is responsible for displaying data to the user. Spring MVC supports multiple view technologies such as JSP, Thymeleaf, FreeMarker, and Velocity.
- Controller: The Controller contains the application's business logic. It receives HTTP requests, processes them, and returns the appropriate response.
- DispatcherServlet: The front controller in the Spring MVC architecture. It intercepts all incoming requests and delegates them to appropriate controllers for processing.
Prerequisites
- Eclipse (EE version)/STS IDE
- Spring JAR Files
- Apache Tomcat latest version
Steps to Build First Spring MVC Controller in Eclipse/Spring Tool Suite
Follow the below steps to run your first SpringMVC Controller.
Step 1: Create a Dynamic Web Project in your STS IDE
- Open Eclipse IDE.
- Go to File -> New -> Dynamic Web Project.
- Enter Project Name: IPBlockFilterProject.
- Target Runtime: Apache Tomcat (choose version installed).
- Dynamic Web Module version: 3.1 (or compatible).
- Click Finish.
Step 2: Add maven Dependencies
Add following dependencies in your pom.xml file.
<project xmlns="http://maven.apache.org/POM/4.0.0"
         xmlns:xsi="http://www.w3.org/2001/XMLSchema-instance"
         xsi:schemaLocation="http://maven.apache.org/POM/4.0.0
         https://maven.apache.org/xsd/maven-4.0.0.xsd">

    <modelVersion>4.0.0</modelVersion>

    <groupId>com.student</groupId>
    <artifactId>myfirst-mvc-project</artifactId>
    <version>0.0.1-SNAPSHOT</version>
    <packaging>war</packaging>

    <properties>
        <maven.compiler.source>17</maven.compiler.source>
        <maven.compiler.target>17</maven.compiler.target>
        <project.build.sourceEncoding>UTF-8</project.build.sourceEncoding>

        <!-- Spring Framework Version -->
        <spring.version>6.2.6</spring.version>
    </properties>

    <dependencies>

        <!-- Spring MVC -->
        <dependency>
            <groupId>org.springframework</groupId>
            <artifactId>spring-webmvc</artifactId>
            <version>${spring.version}</version>
        </dependency>

        <!-- Jakarta Servlet API -->
        <dependency>
            <groupId>jakarta.servlet</groupId>
            <artifactId>jakarta.servlet-api</artifactId>
            <version>6.1.0</version>
            <scope>provided</scope>
        </dependency>

        <!-- JSTL -->
        <dependency>
            <groupId>jakarta.servlet.jsp.jstl</groupId>
            <artifactId>jakarta.servlet.jsp.jstl-api</artifactId>
            <version>3.0.2</version>
        </dependency>

        <dependency>
            <groupId>org.glassfish.web</groupId>
            <artifactId>jakarta.servlet.jsp.jstl</artifactId>
            <version>3.0.1</version>
        </dependency>

    </dependencies>

    <build>
        <finalName>myfirst-mvc-project</finalName>
    </build>

</project>
Step 3: Configure Apache Tomcat Server
Configure Apache Tomcat Server with the application. Now we are ready to go.
Step 4: Configuring Dispatcher Servlet
The DispatcherServlet acts as the front controller and handles all incoming HTTP requests.
<?xml version="1.0" encoding="UTF-8"?>
<web-app xmlns="http://xmlns.jcp.org/xml/ns/javaee"
         xmlns:xsi="http://www.w3.org/2001/XMLSchema-instance"
         xsi:schemaLocation="
             http://xmlns.jcp.org/xml/ns/javaee
             http://xmlns.jcp.org/xml/ns/javaee/web-app_4_0.xsd"
         version="4.0">

    <display-name>myfirst-mvc-project</display-name>

    <servlet>
        <servlet-name>frontcontroller-dispatcher</servlet-name>
        <servlet-class>
            org.springframework.web.servlet.DispatcherServlet
        </servlet-class>
        <load-on-startup>1</load-on-startup>
    </servlet>

    <servlet-mapping>
        <servlet-name>frontcontroller-dispatcher</servlet-name>
        <url-pattern>/</url-pattern>
    </servlet-mapping>

</web-app>
Step 5: Create Spring Configuration File
Now go to the src -> main -> webapp -> WEB-INF and create an XML file. Actually, this is a Spring Configuration file like beans.xml file.
<?xml version="1.0" encoding="UTF-8"?>
<beans xmlns="http://www.springframework.org/schema/beans/"
       xmlns:xsi="https://www.w3.org/2001/XMLSchema-instance"
       xmlns:context="http://www.springframework.org/schema/context/"
       xsi:schemaLocation="http://www.springframework.org/schema/beans/
        https://www.springframework.org/schema/beans/spring-beans.xsd
        http://www.springframework.org/schema/context/
        https://www.springframework.org/schema/context/spring-context.xsd">

</beans>
Step 6: Creating Spring MVC Controller
@Controller marks the class as a Spring MVC controller.
package com.student.controllers;

// Importing required classes
import org.springframework.stereotype.Controller;
import org.springframework.web.bind.annotation.RequestMapping;
import org.springframework.web.bind.annotation.ResponseBody;

// Annotation
@Controller

// Class
public class DemoController {

    // Annotation
    @ResponseBody
    @RequestMapping("/hello")

    // Method
    public String helloWorld()
    {

        return "Hello World!";
    }
}
Note: Spring will automatically initialize the class having a @Controller annotation and register that class with the spring container.
Step 7: Enable Component Scanning
Add the below line inside the frontcontroller-dispatcher-servlet.xml file
<context:component-scan base-package="com.student.controllers"></context:component-scan>
frontcontroller-dispatcher-servlet.xml:
<?xml version="1.0" encoding="UTF-8"?>
<beans xmlns="http://www.springframework.org/schema/beans/"
       xmlns:xsi="https://www.w3.org/2001/XMLSchema-instance"
       xmlns:context="http://www.springframework.org/schema/context/"
       xsi:schemaLocation="http://www.springframework.org/schema/beans/
        https://www.springframework.org/schema/beans/spring-beans.xsd
        http://www.springframework.org/schema/context/
        https://www.springframework.org/schema/context/spring-context.xsd">

    <context:component-scan base-package="com.student.controllers"></context:component-scan>

</beans>
Step 8: Run the Application
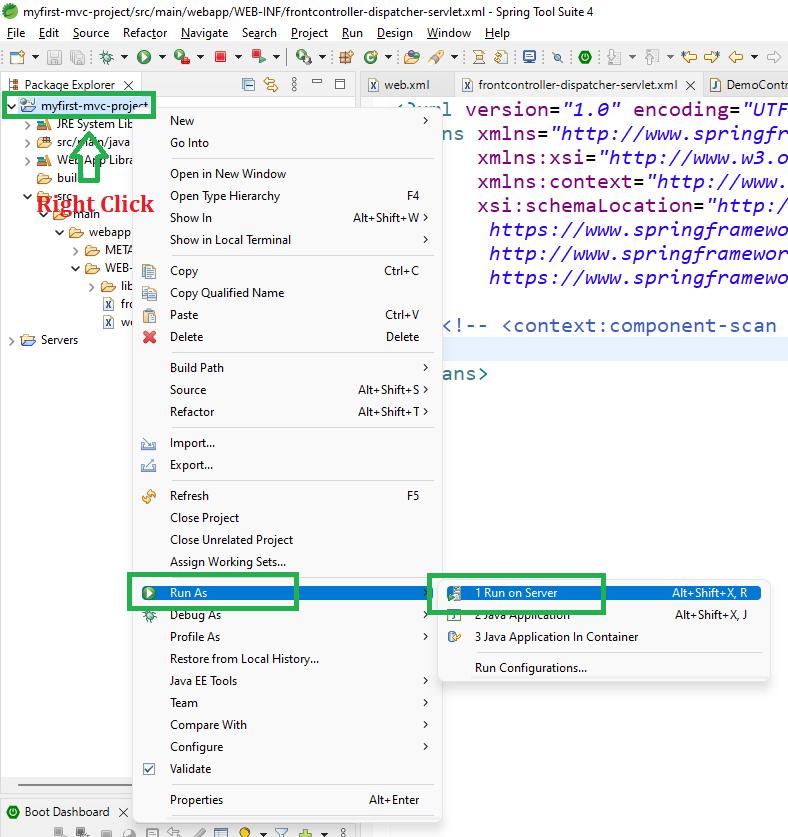
- Right-click Project
- Run As
- Run on Server
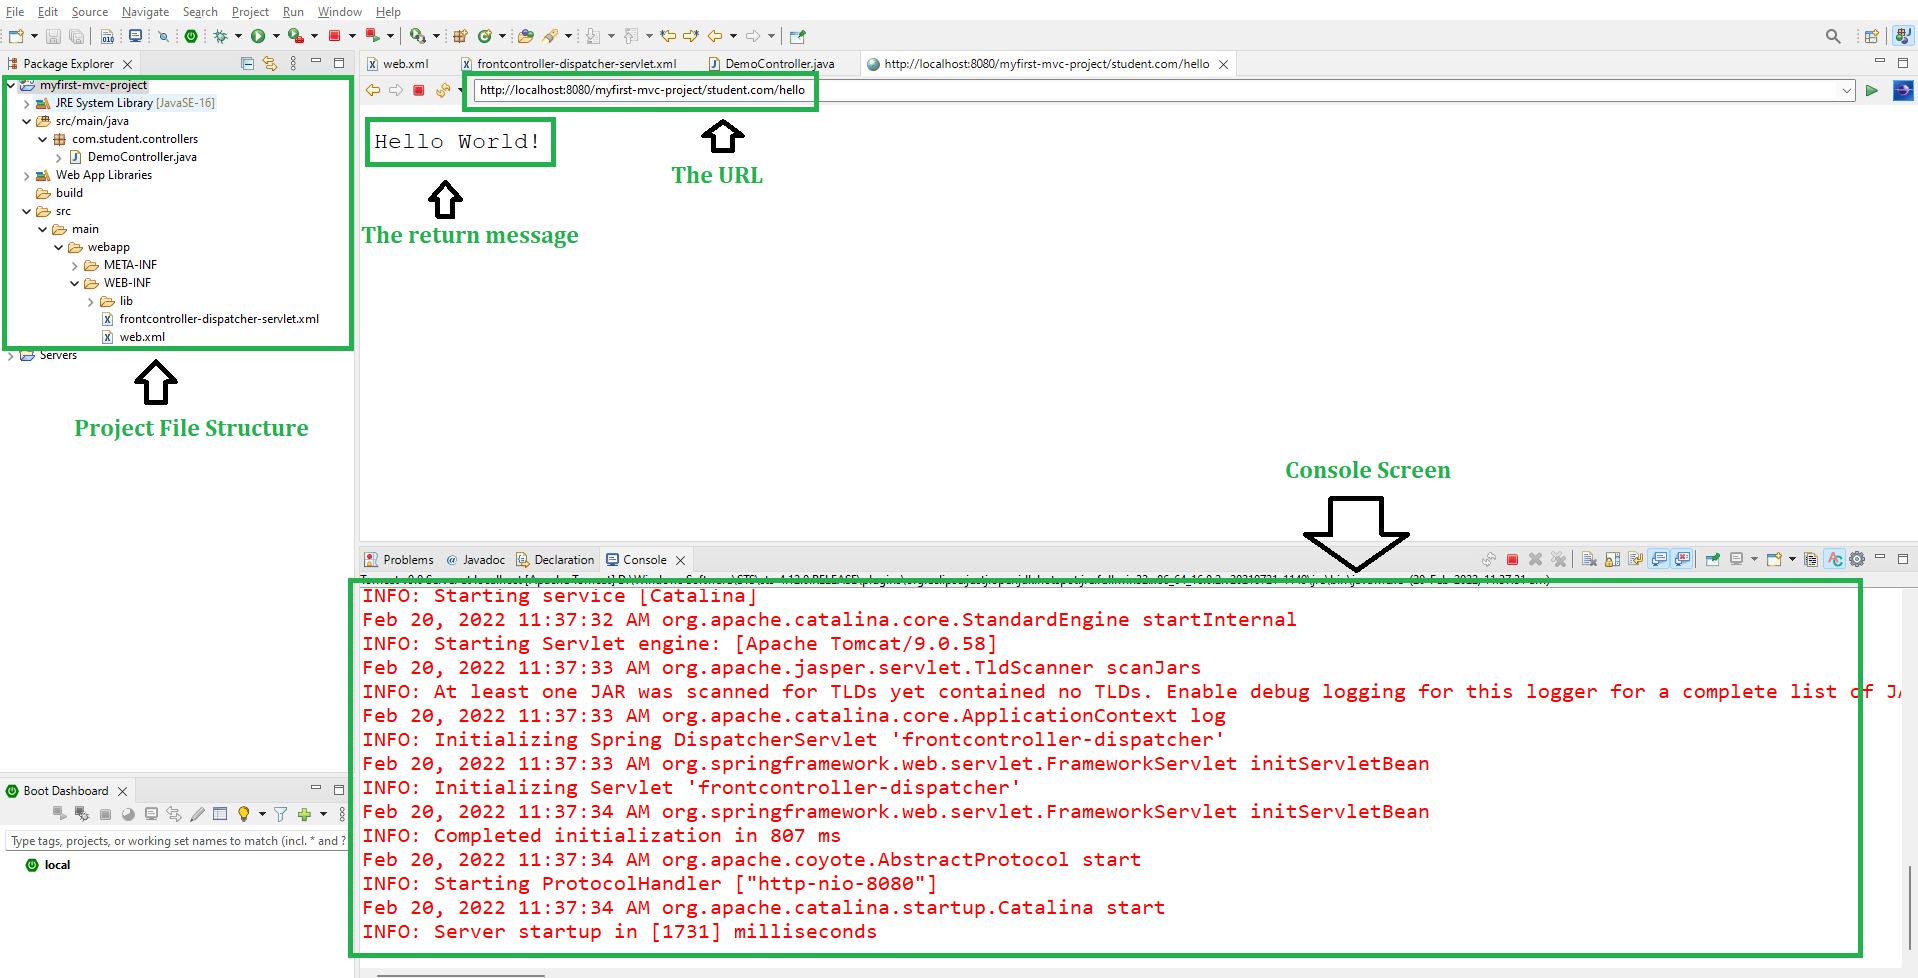
 After that use the following URL to run your controller as shown in the below image. All other details can be perceived through below image as follows:
http://localhost:8080/myfirst-mvc-project/student.com/hello