Server-Side Rendering (SSR) in Next.js generates the HTML for a page on the server for every incoming request before sending it to the browser. This ensures users always receive the latest content while improving SEO and the initial page load experience.
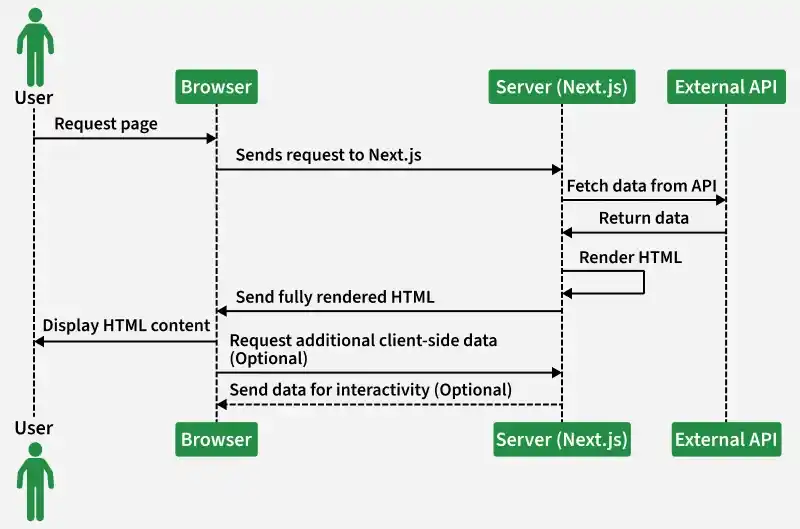
- Generates a fresh page for every request.
- Fetches data on the server before rendering.
- Delivers up-to-date content to users.
- Improves SEO and initial page load performance.
Syntax:
export default async function Page() {
  const res = await fetch("https://api.example.com/data", {
    cache: "no-store",
  });

  const data = await res.json();

  return <h1>{data.title}</h1>;
}
Note: Setting cache: "no-store" ensures that data is fetched on every request, enabling Server-Side Rendering (SSR).
Steps to Create a Next.js Application
Follow the steps below:
Step 1: Create a New Next.js Project
npx create-next-app@latest ssr-appStep 2: Navigate to the Project Directory
cd ssr-appStep 3: Project Structure
ssr-app/
│
├── app/
│   ├── users/
│   │   └── page.js
│   └── page.js
├── package.json
└── ...
Step 4: Create the SSR Page
Create the following file:
app/users/page.jsexport default async function Users() {
const res = await fetch(
"https://jsonplaceholder.typicode.com/users",
{
cache: "no-store",
}
);
const users = await res.json();
return (
<main style={{ padding: "20px" }}>
<h1>Users List</h1>
<ul>
{users.map((user) => (
<li key={user.id}>
{user.name} ({user.email})
</li>
))}
</ul>
</main>
);
}
Step 5: Run the Application
npm run devOpen:
http://localhost:3000/usersThe page displays a list of users fetched from the JSONPlaceholder API. The data is fetched on the server for every request, ensuring users always receive the latest information.
Output: